Project: Shooting Modes
Week: 1 | 2 | 3 | 4 | 5 | 6 | 7 | 8 | 9 | 10 | 11 | 12 | 13 | 14 | 15 | 16 | Schedule
When using Aperture Priority Mode, what do I have control over?
How does that shooting mode give me control over image traits?And what about Shutter Speed Priority Mode?
How do I influence the final image with that?
We'll explore that in this project.
The Short Version
— You'll select, or be assigned, a single subject to shoot for this entire project.
— Shoot your images in JPG format.
— You'll shoot a set of images in Shutter Speed Priority Mode ( 20-25 so images.)
Vary shutterspeed as you shoot.
Vary point of view for effective composition.
— You'll shoot a set of images in Aperture Priority Mode (another 20-25 images or so)
Vary aperture as you shoot.
Vary point of view for effective composition.
— Select 4+ images from each set.
Compose these 8+ images into a composite image demonstrating the effect of varied exposure settings.
Shutter Speed Priority Mode Series | Aperture Priority Mode Series
Suggested Process:
— Use Bridge to survey your images and to select the best exposure of your best images.
— (Do NOT use post-processing (Camera Raw, or Photoshop, etc.) to perform color, contrast and tonal editing of your images — You may crop images.
— Select the most distinctive images from each set. Select the images based on their demonstration of the effects of varied exposure settings.
— Create a composite of your 8+ final image sets, presenting them as a unfied whole with annotations.
— Convert final images and composite to mid-size JPGs.
— Upload your 8+ basic images, and your composite to G+ photo album "003 Shooting Modes". Add the album to your Photography_Art265 circle.
— Comment and crit your images and your peers' images.
Project Topics: Concept | Preparations | Process | Content | Sorting | Editing | Presentation | Turn In | Resources | Deadlines
Exposure | Aperture | Shutterspeed | ISO
Goals & Concept
This project may not seem particularly creative.
Sorry.We’re trying, here, to get to know the two aspects of the exposure trinity — aperture and shutter speed.
The main goal is to see the effect of changing these settings in the images we shoot.
We'd like to get familiar with, and comfortable doing, changing aperture and shutter speed in the field.
We’re also working to get familiar with a way of record-keeping in the field. While your camera stores a great deal of metadata with each digital image, there is still more information needed to plan and problem-solve shooting conditions.This project has three stages.
First you’ll shoot images using shutter speed priority settings.
Then you will shoot images in aperture priority mode, using different aperture settings.
Also involved: depth of field, basic camera setup, image organizing, image editing, uploading are exercised.Prep
Setup Summary:
Image File format: JPG
________________________________________________________________________________________
If needed, review the basic operations of a digital SLR.
DigiTutor: Intro/demo for D7000 features from Nikon | DigiTutor: Intro/demo for D90 features from NikonHave a camera manual PDF for your camera: D7100 | D7100 Spanish | D7000 | D90 | D7000 Spanish | D90 Spanish
See earlier project's Prep notes for basic setup steps, but note the different settings needed for this week's shoot described below.
________________________________________________________________________________________Basic Setup
Get your camera ready to shoot. The checklist linked here goes through most steps you're likely to need.
Until you're comfortable setting up an SLR, skim over these steps before starting.
If you are checking out a borrowed camera, you do have to check over more details than when the camera is your own. When others have used a camera, they may have reset any of a great many settings. It may seem tedius to check over some of these details, but it is less frustrating than when you shoot a set of images with something set incorrectly.— It's wise to reset the camera's default settings before you start your own setup.
— Set your image-file Format: JPG
Set your camera to save JPG format files for this no-post-processing project.— You may want to clear your memory card.
— Check the Release Mode Dial. For most shoots, you'll want it set to S (single frame).
D7000 Manual — p. 7, 77-78 | D90 Manual— p. 64-65— Check the basic Focus Mode. For most shoots you'll want the camera and lens set for auto-focus.
With some Nikon lenses you'll need to set a switch on the camera, as well as a second switch on the lens.
Camera Manual PDFs: D7000 Manual — p. 91, 99 | D90 Manual — p. 54, 59_______________________________________________________________________________________
Process
First Shutter Speed Priority Set
Reset your camera to default settings.
Auto-Focus ON
Meter:
Focus Mode: Auto
Pick a subject that is in motion, if you've not been assigned a particular subject.
Action subject for Shutterspeed priority
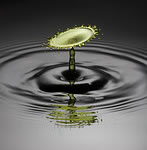
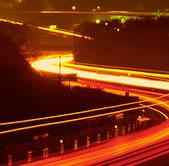
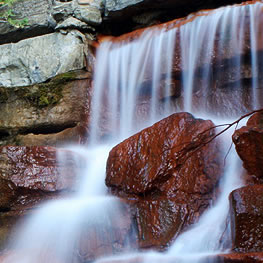
Subject suggestions: the fountain in front of the Admin Blg., the cascading water wall near the Heritage main entrance, athletes in action, cars going down Race St., water flowing out of a faucet, a billowing flag on a windy day, etc. It could be children playing at a playground or people having an animated conversation in the Student Center or coffee shop.
Or better, find your own action/motion-dominated subject.
Sample1 | Sample2 | Sample3 | Sample4 | Sample5 | Sample6
Not all subjects work equally well for exploring shutterspeed's impact on imagemaking.
You may want to shoot some sample images before finally deciding.
Not all settings offer adequate illumination for strong images and, here, we are shooting with available light — no flash.
If possible, find a subject that has some rich color. If you can’t, that’s fine — motion is more important, here, than color.
Work to frame your images for impact. Compose so that there is a strong and definite direction or movement through the composition.
If there is directional motion, you'll typically want it leading into, rather than out of, the composition.
Work the shot for best impact, and, at the very least, try moving closer and cropping tighter — crop until you know you've moved in too far, then back out.
Get an initial exposure setting — figure out what aperture, shutter speed and ISO is adequate using the camera’s built in meter.Set your ISO to 400. D7100 — p. 79 (ISO btn & Main Cmd Dial) | D7000 Manual — p. 101 | D90 Manual — p. 74
Set your shooting mode to P (program... full auto exposure). D7000 Manual — p. 6 | D90 Manual— p. 6
Frame an image of your subject and notice the recommended shutter speed and aperture through the viewfinder.
— if the shutter speed is slower than 1/100, increase your ISO to 800 or, if needed, to 1600.
— if the shutter speed is faster than 1/250, decrease your ISO to 200 or, if needed to 100.
Journal your initial aperture, shutter speed and ISO.
These settings are your initial exposure setting for this photo shoot.
Set Exposure for this series:
Set your camera to Shutter speed priority ( S on Nikons; Tv on Canons) (Manuals p. 6)
Set ISO as per your noted initial settings, above. ( D7000 Manual — p. 101 | D90 Manual — p. 74 )
Set your initial shutter speed as noted above. ( D7000 Manual — p. 69 | D90 Manual — p. 81 )
Shoot (at least) 7 images in a motion study series, varying shutters speeds as described below.
Figure out the shutters speeds you’ll be using.
You’ll shoot three frames faster than your initial shutter speed, and three slower.
Each shutter speed will be roughly ½, or 2x the speed of the next.
For instance, if your initial shutter speed is 100...
...then you might shoot a set of images at these speed: 1/13 | 1/25 | 1/50 | 1/100 | 1/200 | 1/400 | 1/800
Or if you’re initial shutter speed is 250...
...then you might shoot a set of images at these speed: 1/30 | 1/60 | 1/125 | 1/250 | 1/500 | 1/1000 | 1/2000
(quick tip: on a D7000, rolling the main command dial (in back) three “clicks” will either double or half your shutter speed, depending on which direction you’re rolling. ( D7000 Manual — p. 69 | D90 Manual — p. 81 ))
Sketch and Journal notes on exposures, lighting and motion.
Photographers are always wondering about the setting used on "that shot" -- whenever some shot captures something unusual. Photographers want to know the exposure settings and lighting conditions when the shot was taken. Many photographers keep a journal, notepad or sketchpad with notes on each photo shoot.
When documenting a shot you've taken with unusual traits or shooting conditions, your journal notes enable you to revisit and remember how to solve.
Your exposure details are recorded in each image's metadata, but note these essentials in your journal.
Lighting: Where is it coming from? How many light sources? How intense? How diffuse or sharp? Any color bias?
Motion: sketch a thumbnail of the movement that either the subject, or you were making. Try to convey fast vs. slow movement. You might use arrows to describe movement side to side, or near-to-far or vice versa.
The goal of a photographer's journal is to make if possible to recreate an image later — or, rather, to reuse a shooting setup with a different subject. Also, difficult-to-solve setups can be described along with possible solutions.
You’re looking for distinctly different images — aim to find the speeds that show movement in notably different ways. Some of your images will be effectively identical, especially your higher speed images. However, your slow speed images may vary in character a great deal.
Work to find movements and speeds that create evocative images of motion — that express distinct qualities of movement in a static image.
Holding the camera steady: at speeds below about 1/60 of a second you need to be very careful when making the actual shot. Ideally you use a tripod.
Here, lets do these basic in-the-field slow-shutter shooting tactics:
— hold the camera very securely. Not tight, per se, but steady.
— slowly squeeze the shutter button rather than pouncing on it. You want to not move the camera as you press.
— at very slow shutter speeds, pay attention to your breathing. Take a deep breath. Breath out... shoot as your reach the end of your exhale.
— if at all possible (important) lean against something solid... a wall, a post. If possible, rest your hands or the camera against something steady.
— if standing upright, keep your elbows tucked next to your body.
— for very slow speeds, you might try shooting several frames and later selecting the best, sharpest one.Suggestion:
Shoot multiple frames at the same speed in hopes of getting one whose motion traits are interesting. Photographing subjects in motion is always tricky and involves a bit of luck — you rarely expose at precisely the right instant for the the effect you're after.
Also, frozen motions usually don't appear as you expect — they are somehow other than normal, and sometimes a bit otherworldly.Suggestion:
You might pick a subject that involves you moving rather than it moving.
That is, you can shoot a person walking past you, or you can aim at someone standing still while you walk past them. If the shutter speed is slow enough, both tactics will produce motion blur in your image.
Either the subject can be in motion, or the camera can be in motion — or both.
Later you’ll find the five most distinctly different images.
Upload them to 003 Shutter Priority album.
Composite the three, side-by-side and add captions underneath with each image’s exposure settings.
_____________________________________
Aperture Priority Set
Shoot depth-of-field (DOF) rich subjects in Aperture priority mode, using manual focus.
Manual Focus ON: note that both your lens and camera may need to be switched to manual focus (M)
With some Nikon lenses you'll need to set a switch on the camera, as well as a second switch on the lens.
Camera Manual PDFs: D7000 Manual — p. 91, 99 | D90 Manual— p. 54, 59
Turn Auto-ISO Sensitivity OFF (follow instructions, above for turning it on... but select OFF)
Select your subject: find subjects/objects at many depths/distances in one image
You might look down a long wall, standing very close to the wall. Or look down a long fence or a long row of trees or a long row of parked cars... down a long aisle at the grocery or Walmart ... or aim down a long row of students sitting in class. What we’re looking for is a scene in which there are objects at many different distances from the camera. Ideally, you want something interesting at each of several depths.
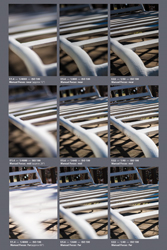
Sample1 | Sample2 | Sample3 | Sample4 | Sample5 | Sample6 | Sample7 | Sample8 | Sample9
Subject matter that is very close to the camera offers more dramatic DOF traits because of the optics that actually cause shallow DOF. So, if you can frame a scene in which objects are very close as well as very far away...and hopefully something interesting in between, you’ve got a good candidate for this shoot.
Get an initial exposure setting — figure out what aperture, shutter speed and ISO are adequate using the camera’s built in meter.— Set your ISO to 400.
Press ISO button and roll main command dial: D7000 Manual — p. 101 | D90 Manual — p. 74
— Set your shooting mode to P (program... full auto exposure). Rotate the Mode dial to "P"
Camera Manual PDFs: D7000 Manual — p. 68 | D90 Manual — p. 80
— Frame an image of your chosen subject and notice the recommended shutter speed and aperture through the viewfinder.
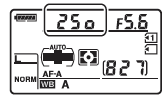
In the Control Panel of a D7000 (on top, right of the camera) you'll see the current shutterspeed and aperture.
Here the shutterspeed is 1/250 of a second. ( "250" is displayed)
The aperture is f/5.6.
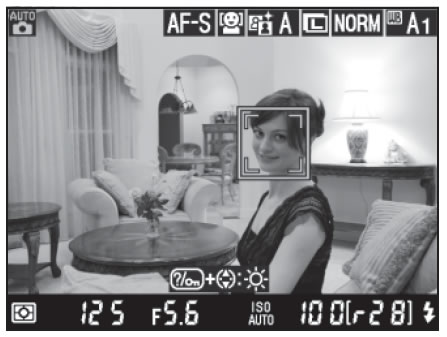
In the Viewfinder of a D7000 while framing an image, you'll see the current shutterspeed and aperture.
Shutterspeed is at the bottom left.
Aperture is at the bottom center.
Here the shutterspeed is 1/125 of a second. ( "125" is displayed)The aperture is f/5.6.
— if the f-stop is higher than f/11, increase your ISO to 800 or, if needed, to 1600.
— if the f-stop is lower than f/8, decrease your ISO to 200 or, if needed to 100.
— keep adjusting ISO until your aperture is between f/8 and f/11.
Journal your initial aperture, shutter speed and ISO.
Set Exposures and Shoot
Set your camera to Aperture priority shooting mode. ( A on Nikons; Av on Canons)
Set ISO as per your noted initial settings, above.
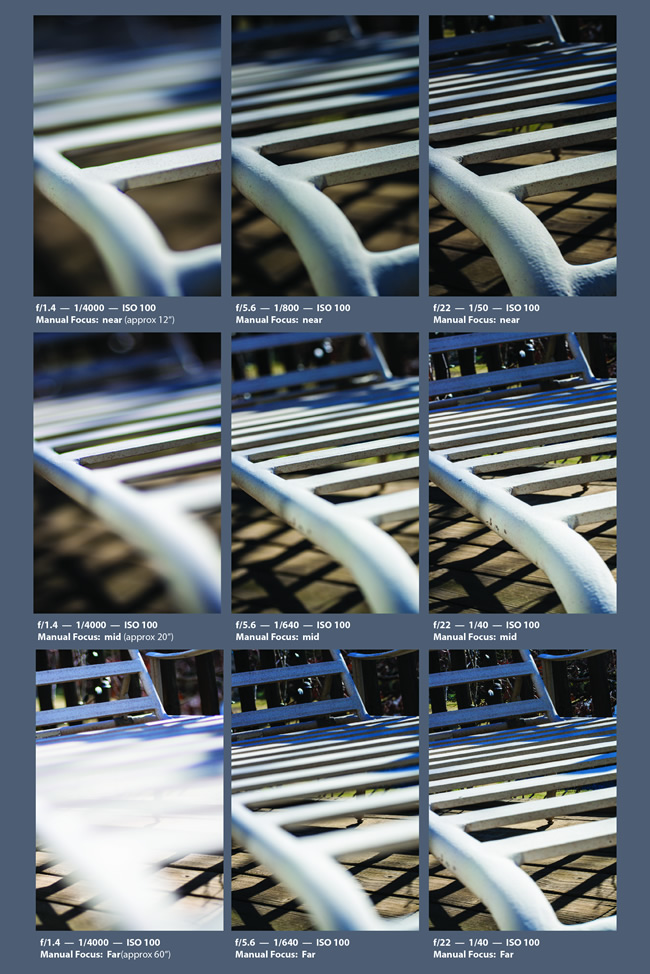
Shoot (at least) 5 images in a depth of field study series four or five times — focusing at different distance for each series.
Figure out the apertures you’ll be using.
The shots you can take are limited by the lens you are using. Each model of lens offers it own maximum and minimum aperture, so you can only go as far as the optics of your lens allow. You’ll shoot as many shots above and below your initial aperture as possible.
Use apertures that are ½, or 2x the opening of the next. (see next)
You might want to visit our notes on Aperture.You might focus first on the closest subject first and shoot a full set of aperture-varied images.
Carefully frame your scene so that your composition is well balanced, has adequate dynamism, has likely focal areas placed well, and so forth. Each of your images should be framed roughly the same — in fact, you could shoot this entire collection of near-distance, middle distance, and far distance sets on a tripod and not move it all all — just adjust aperture and focus.
This will be your near-distance set.
Shoot at as many of these apertures as your lens allows:f-stops: f/2.8– f/4.0 – f/5.6 – f/8.0 – f/11 – f/16 – f/22– f/32
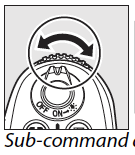
Set your aperture for each shot by rolling the Sub-command dial... just in front of the shutter button.
You'll be able to see the changing aperture number through the viewfinder near the bottom center.
You likely won't be able to get an f/2.8 or an f/32... and possibly not an f/4.0. Those apertures are available on better lenses, but not on typical entry-level lenses.
Note that you can preview the DOF effects by pressing the Depth-of-field preview button while you are framing your shot. The DOF Preview button, on the D7000, is on the front of the camera, near the 7 o’clock position of the lens mount. This button closes down the aperture to its shooting position, and so shows you a darker view through the viewfinder, but at wide apertures you can, to some extent, see the variations in focused and unfocused areas of your image.
Now go back and shoot another set. The only difference is that this time, manually focus on a subject a middle distance away from you. So, again, you'll shoot a set of images, each at a different aperture.
This is your middle distance set.Then shoot one last set. This time, manually focus on a subject far away from you. Again, shoot a full set of images, each at a different aperture.
This is your far distance set.
Suggestion: Shoot more. Pick the best.
Once you've shot a full collection of near-distance, middle distance, and far distance sets you'll have, 15 or more images. You can likely shoot another set of another subject very quickly and easily once you're familiar with the steps and how to adjust aperture.
Most photographers shoot many images they won't use in hopes of finding the images worth keeping. Push yourself to shoot this aperture-varied collection a few times and then pick the best set for final editing and uploading.Suggestion: Try Focus Lock with Auto-Focus ON
The assignment is an ideal manual focus-shooting problem. However, you might want to try another tactic that pros use all the time — Focus Lock.
You'll need to turn Auto-Focus back on: D7000 Manual — p. 91 | D90 Manual — p. 54
a) aim at your main subject... position subject in the center of the viewfinder (this tells the camera what to focus on)
b) press the shutter button half-way down (this locks the focus at the current distance)
c) reframe your view for best composition (still holding the shutter button 1/2 way down)
d) shoot --- press the shutter the whole way.
Camera Manual PDFs: D7000 Manual — p. 97 | D90 Manual — p. 57
Selecting Final Images:
You will pick at least 4 images from each set — 4+ from the aperture priority set, and 4+ from the shutterspeed priority set.
You’re looking for distinctly different images — aim to find the apertures that show depth of field in notably different ways. Some of your images will be effectively identical, especially your high aperture images.
The point is to present the distinct differences available when aperture and focus-distance are under your control. Work to show that off by the images you select.
Prepare a Composite of all images in a grid.
You might put your best three near-distance images on a bottom row, mid-distance images in the middle row, and far-distance images on top. Your wide aperture images might be on the left column, mid-aperture images in the middle column, and small aperture images on the right.
It does really matter what order your rows and columns are in, your job it to arrange them in an orderly way so we, the viewers, can compare the effects of aperture and focus distance.
Underneath each image, type the aperture, shutterspeed and ISO of each image.
(e.g. "f/8.0 — 1/125 — 400" )Create downsized copies of your image -- roughly 3 megapixels. (see notes on downsampling images in the "Tutorial" links, below)
Upload your to 003 Shooting Modes album.
Google+
— Upload your JPEG image sets and composites to Google+ into your “003 Shooting Mode” albums.
Drag that album into your Photography_Art265 circle.
— Add comments to your photos and album. Describe the traits that unify this set of images. Write a short (25-75 words) concept statement that describes the visual traits or ideas that this set of images emphasizes.
— Review and comment* on the photos uploaded by at least 5 other students before class.
* Provide relevant comments (25+ more words) discussing what you see in the photos presented -- comment particularly on what impresses you or what catches your eye. Comment on what you think might improve the cropping or editing of the presented photos.
Tutorials and Resources
These videos cover the basic batch conversion process that you’ll want to know.
For most of our in class uploaded images, save as JPG, quality 10 (or so); size W 2000 x H 1500 (these define the maximum dimensions of the final image -- so your converted image will be the same shape/proportion as before, but now the max height will be 1500 pixels and the max width 2000 pixels. That’s low res for a printed image, but actually a bit large for most online viewing, but should be fine.Resizing
Required — Deadlines and Details
By Thursday, 8am
Shoot the Aperture Priority Sets and the Shutter Speed Priority Sets described above.
Shoot at least 20+ images for each exposure priority mode set.
Select (at least) 8+ of those for presentation. (crop them down to interesting compositions)
Create a composite image of the final 7 images, depicting how they might be presented as a series.Downsize images to ~2Mpix JPGs before upload.
Post to G+ :
Album: 003_ShootingModes (8+ series images & 1 composite image)Write critical comments about the final series images:
— Discuss the strengths of several of the final images in relation to the exposure issues explored.
Thursday, before Class
Crit your Peers:
Go to G+ and review what your classmates have uploaded.For at least 7 of your classmates, go to their 003_Shooting Modes album.
(comment on different folk's work each week... vary who you comment on.)Add comments to at least one image, or to their series as a whole.
You comments might include...
— Make suggestions for any changes or edits that might improve either a particular image, or the series as a whole.