Until more genuinely helpful content is posted... start here..
Adobe Bridge CC Reference Manual PDF (9/13) | Adobe Bridge CC Help/Tutorials from Adobe
Adobe Bridge CS6 Help and Tutorials PDF |
Adobe Help/Tutorial Links for Bridge and Mini-Bridge
Getting Started video tutorials from Adobe
Using Adobe Bridge PDF from O'Reilly.com
Asset Management | Collections | Batch Conversion | Tutorials |
Image and Asset Management
Bridge is an image organization tool.
Actually its an asset management application, which means that you can use it to organize many types of files other than images, including videos, PDFs, etc.Bridge is a sort of super-charged iPhoto for organizing and finding those masses of images that any serious photographer shoots. Note that Lightroom & Aperture also offer image-organizing tools. However, Bridge is what ships with all Adobe CS products — so we all have access to it.
Set up folders to organize images and projects.
Manage filenames and make batch changes to project filenames.
Create collections as an alternative to folders.
Set up Metadata, Keywords, rankings and Tags for individual images, or folders or collections of images.
Search on keywords and on other image traits.
Export, resize and convert formats of single images or batches of image.
Drag-Drop images to Photoshop.
Collections
Collections are like folders, except that the original images all remain in the original folder. The collection just stores a link to the real image -- an alias of sorts.
(How to create a “collection”? there’s a panel usually in the lower left corner of Bridge with tabs for Filters | Collections | Export.
With Collections selected, there’s an icon at the bottom of the panel that looks like a folder with a “+” on it. That adds a collection.)
Batch Convert to Downsized JPEGs
Often you'll want to create alternative versions of the images that you create for various purposes.
In this course, you're likely to be working on large (i.e. 10-17 megapixel) images in Photoshop and Camera RAW, but then uploading smaller versions of those images to G+ for critiques and in-class presentation.How to do that quickly?
How do you convert a whole lot of images at once, so that you don't have to "Save As..." or "Save for Web..." one image at a time in Photoshop?Bridge can do it.
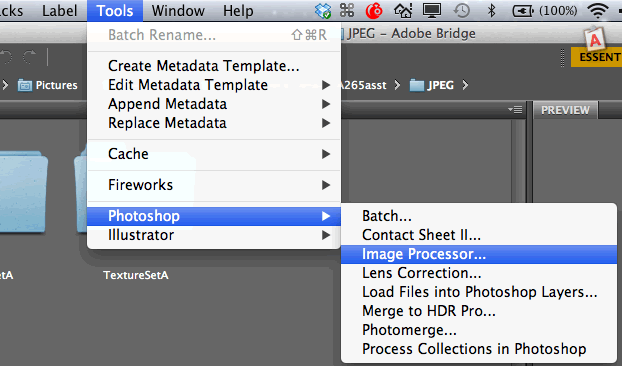
Well, actually, you set up a batch process in Bridge, and Bridge then, very helpfully, sends Photoshop instructions on what you want done, and Photoshop does the actual work of converting the images for you.In Bridge
a) Select the images that you'd like to downsample and convert to JPEG.
Use Cmd-Shift techniques to multi-select the images that you want from the thumbnails in the Content panel.b) Give the Image Processor command:
Tools (menu): Photoshop...: Image Processor...
c) Set up your particulars in the Image Processor dialog box.
Image Processor settings to prep images for G+ uploading...
1) Don't change this — just let Bridge use the images you've already selected.
2) Save in Same Location.
(Bridge will create a folder within your current folder named JPEG. Your converted images will be in it.)
3) File Type: Save as JPEG;
Quality 10 (or so);
(the higher the setting the better the image quality and the larger your image file)
Resize to Fit W:1500 H:1500
(this will make the maximum width or height 1500 pixels. The proportions/shape of your image will remain as they were.)
sRGB
This is the underlying color profile for your image. It controls how colors are actually described and adjusted for viewing and printing.
sRGB is a widely used color profile with a broad color gamut, thus, unless you have a reason to use another profile, this is a good one.4) Preferences
I'll usually leave these settings as is, except that this is a really convenient time to add a copyright statement into the metadata of your image. Viewer's won't see this, but anyone interested can access the copyright and know that the image is, in fact, yours.
Put the year that the image was shot, and your name.
I usually include an email address as well — thus if someone want to contact me about purchasing or publishing the image, they can easily contact me.
Hit the Run button and Bridge and Photoshop will do the rest.
The batch process can take from a few seconds to several minutes or more, depending on how many images you have selected.
When Bridge and PS are done working, your images will be in a JPEG folder inside your current image folder (unless you told Bridge to put them elsewhere in #1, above.)Note that if you have Image Processor settings that you repeatedly use, you can actually fill out this dialog box, and then save the settings. Hit the Save button and put the settings file someplace you'll remember it. (I usually create a _Settings folder in my main image folder.) Next time you want to convert a bunch of images, just load that settings file and via the Load button.
Tutorials and Resources
Bridge is Going to be Your Best Friend – Basix
Intro to Adobe Bridge; 10m
Use Star ratings to rank your images.
Flag your best images and your good image. A good habit: do a quick survey of a set of images and give, say, a 3-star ranking to any candidates for further editing or printing. Later you can slow down, study your images and rank some higher or lower. But, at first, just separate the images with potential from those that don't appear to be "keepers."
Use the loup/magnifier to zoom in and check details.
Set up Keywords for your particular type of images. What words, phrases or categories will help you find and sort images?Other: add notes; filtering; keywords;
______________________________________________________________________Mini Bridge
"Easily view and access all your image assets directly in Photoshop CS5 with the customizable Adobe Mini Bridge panel. Finding and opening images has never been faster or more convenient. Mini Bridge even provides quick access to several powerful new features in Photoshop CS5 like Merge to HDR Pro and Photomerge."______________________________________________________________________
Understanding Adobe Photoshop: 190 UAP Importing Images with Adobe Bridge
Richard Harrington Blog 190 UAP | BlipTV 190 UAP |
From memory card, to Adobe Bridge, to Photoshop.
Bridge is basic stuff. As soon as you begin shooting seriously, you need to be able to organize the images that you shoot. That’s what Bridge helps with.Bridge is an easy tool for browsing your images.
Adjust size of thumbnails.
Get Photos From Camera to access photo-downloader.
Advanced file renaming: use this to organize for later searching.
Add Creator: Your name
Add Copyright:
…then images are moved to your hard disk with filename and metadata corrections.