Getting Started Shooting
If you've not shot a digital SLR before, or haven't shot with our equipment, take time to review the notes below.
The "First Time Out" notes may be more detailed than you need, but skim each topic to be sure you aren't overlooking something basic.Our Camera Equipment
Checking a Loaned Camera
Typical Setups
Setup — Program Mode
Setup — Manual Mode; Single-Point Auto-Focus
Our Cameras
The Art & Design Department has several cameras that you can check out for use during this course. Go here for information, tutorials and manuals for our equipment.
First Time Out — setting up and shooting in Program Mode
Review the basic operations of your SLR.
DigiTutor: Intro/demo for all D7100 features from Nikon | D7100 Manual — p. 1-33
DigiTutor: Intro/demo for D7000 features from Nikon | D7000 Manual — p. 1-34
DigiTutor: Intro/demo for D90 features from Nikon | D90 Manual — p. 1-32Download a PDF of the manual for the camera you are using: D7100 | D7100 Spanish | D7000 | D90 | D7000 Spanish | D90 Spanish
The absolute start-up basics for camera use are presented well in the camera manual.
Read these few pages of instructions about handling, framing and shooting.
Camera Manual PDFs: D7100 Manual — p. 35-39 | D7000 Manual — p. 35-38 | D90 Manual — p. 34-39
Strap in, Lens cap off:
Put the camera strap around your neck or wrist to keep the camera secure and safe. Make that a habit every time you pick up an SLR.
Take the lens cap off. Slip it into a pocket — either in your clothing or in your camera bag. That's another good habit.
[NOTE on good practice: Do not aim a camera directly at the sun. Like your eyes, the camera's sensors can be burned out... and sensors damage more easily than your eyes.]Turn it On & Check Battery
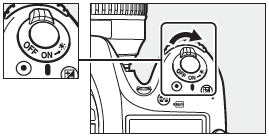
On the top of the camera, near the front-right corner is the On/Off switch. Rotate to ON.
Note that the Shutter Button is at the center of the on/off ring.Check to be sure the battery icon shows adequate charge.
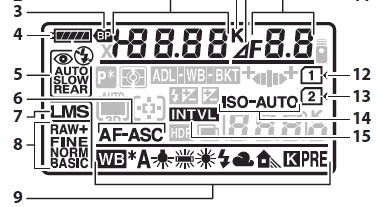
In the main panel on top, check #4, above, the battery indicator icon.
If it is below half-charged, get a new battery or take time to charge the current battery.Start Fresh with Borrowed/Loaned Camera:
Whenever you borrow a camera, you don't really know what settings were left by the prior user.
It's wise to reset the camera's default settings before you start your own setup.On the D7100, simultaneously hold down the ISO button and the +/- (exposure compensation) button for 2 seconds. Note: both buttons have a •green dot!
On the D7000 restore default settings by simultaneously holding down both the Qual button (back... lower left) D7100 Manual — p. 131
and the +/- button (back... upper right) for more than two seconds.
D7000 Manual — p. 151
On the D90, simultaneously hold down the +/- button and the AF button for two seconds. Both are on the back, right side.
D90 Manual — p. 75— Have a memory card prepped and loaded. Our Nikons use SD cards — ideally Class10 or faster.
Camera Manual PDFs: D7100 Manual — p. 30 | D7000 Manual — p. 29 | D90 Manual — p. 29Your memory card might need to be formatted — particularly if it is new.
Keep in mind, formatting a card erases everything that is on the card. So, if you're using a card with content already on it, backup all essential files before formatting the card.
Camera Manual PDFs: D7100 Manual — p. 32 | D7000 Manual — p.32 | D90 Manual — p. 30On the D7100/D7000, there are two memory card slots.
Initially, just put only one card in the camera.
(that way you don't have to set the camera to save to a particular card — it will automatically find the sole installed card.)— You'll be shooting in Program Mode with auto-focus on — the camera is thus on autopilot.
You just point and shoot.How to set Program Mode: Rotate the Mode dial to "P"
Camera Manual PDFs: D7100 Manual — p. 48 | D7000 Manual — p. 68 | D90 Manual — p. 80
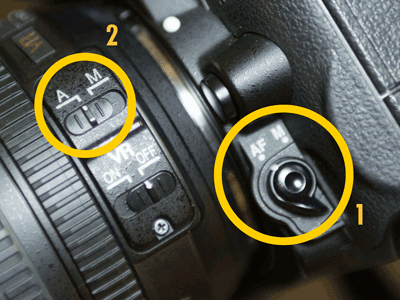
Set Auto-Focus:
1) Rotate camera's AF-M selector to "AF"
Where's that?
Look at the front of the camera, next to the lens at the 4 o'clock position.2) Switch the lens A-M selector to "A"
(not all lenses have such a setting.)
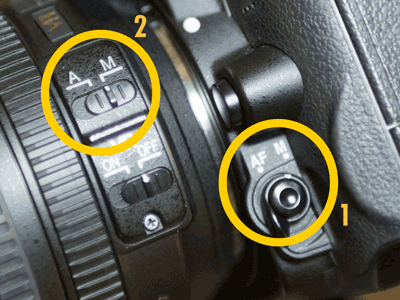
Camera Manual PDFs: D7100 Manual — p. 71 | D7000 Manual — p. 91 | D90 Manual — p. 54Set Manual Focus:
1) Rotate camera's AF-M selector to "M" (manual)
2) Switch the lens A-M selector to "M"
(not all lenses have such a setting.)
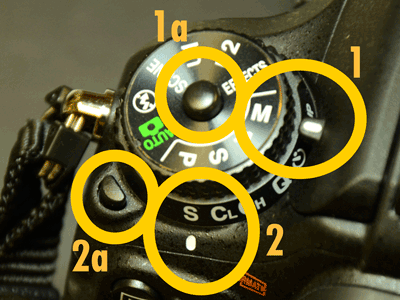
Mode Dial and Release Mode Dial
D7100
D7100 has a Mode Dial and a Release Mode Dial.
1) Set the Mode Dial to M for Manual.
Rotate the dial (1) while holding down the mode dial lock release button (1a).2) Set the Release Mode Dial to "S" for "single frame"
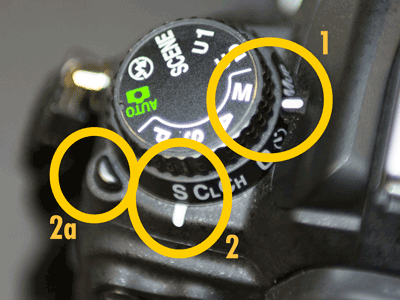
You'll need to hold down button 2a (the Release Mode Dial lock release... really?) while you rotate the lower dial.D7000
D7000 has a Mode Dial and a Release Mode Dial.
1) Set the Mode Dial to M for Manual.
Just rotate the dial.2) Set the Release Mode Dial to "S" for "single frame"
You'll need to hold down button 2a (the Release Mode Dial lock release... really?) while you rotate the lower dial.D90
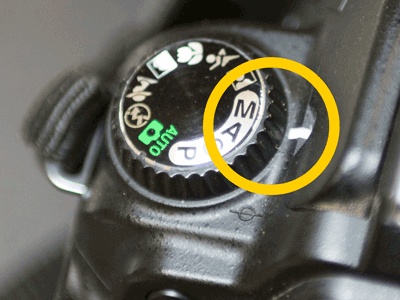
D90 Has a mode dial (but has no Release Mode Dial)
— Set your image-file Format: JPEG Fine
Set your camera to save full size JPEG format files. If you've reset the camera to default settings, you're shooting JPEG - Normal (a lower resolution than Fine)
RAW offer deeper image data, but you'll need to be familiar with the program "Camera RAW" that Photoshop opens when loading a RAW file. Until you're introduced to Camera RAW, use JPEG.
How to set file format:
Camera Manual PDFs: D7100 Manual — p. 66-68 | D7000 Manual — p. 85-86 | D90 Manual— p. 62-63Viewfinder Diopter Adjustment:
This adjusts the viewfinder for your vision -- it doesn't focus the photo you're taking, but does focus the viewfinder display.
Usually this will be set correctly. It allows you to adjust the viewfinder's focus for varying eyesight.
Camera Manual PDFs: D7100 Manual — p. 33 | D7000 Manual — p. 34 | D90 Manual — p. 32Shoot some images!
Check on how your images look.
Use Image Review to see the images you've shot. Feel free to delete obviously useless images — that's a part of the freedom of digital photography.
Camera Manual PDFs: D7100 Manual — p. 39-40 | D7000 Manual — p. 46-47 | D90 Manual — p. 48-49
Shooting Modes
Shooting modes determine what you want control over, and what you want the camera to handle.
In each mode, you are in control of some settings, and the camera is responsible for computing and setting other settings.
Aperture and Shutterspeed Priority Mode Intro Article |Program (P)
Full-auto exposure. Both aperture and shutter speed are calculated by the metering system. You have control over exposure compensation and ISO.
Aperture Priority (A)
You set the aperture, and the camera's metering system sets the shutter speed. You can also set exposure compensation and ISO.
WikiHow on Aperture Priority Mode |Shutterspeed Priority (S)
You set the shutter speed, and the camera's metering system sets the aperture. You can also set exposure compensation and ISO.
Manual (M)
No automatic exposure features are active — that is, the camera does not set either shutterspeed or aperture. However, the exposure meter displays over/under exposure readings based on the current shutterspeed and aperture settings.
The user sets both shutter speed and aperture using the dials near the shutter button.Scene Modes:
These are automatic exposure modes designed for common shooting situations. The camera's light meter and computer make decisions about shutter speed, aperture and ISO. When using scene modes, you don't have to know anything about the craft of image exposure, you just have to know what sort of shooting situation you are in. These modes are not usually used by professional photographers since these modes offer the knowledgeable photographer far less control, while the camera's computer takes more control and imposes possibly unreliable assumptions into the exposure calculations.
Action/Sports: Any situation in which fast-motion is involved. If illumination is low, the flash will fire.
Landscape: Buildings or nature scenes in which the subjects tend to be far away (say, 15' or farther) as well as being still or slow-moving.
Portrait: Subject matter is near (3-15 feet away) and is not moving much.
Night/Low Light: Light is low. Flash will usually fire. If your subject is dark, it will need to be close (less than 15' away). If your subject has its own lighting (say a Ferris wheel with lots of neon lights on it.), distance doesn't matter.
Macro/Close-up: Subject matter is very close (6" to 3' *) and is not moving much. (* note that every lens has its own "minimum focus distance" — any subjects closer than that will be blurred.)
No-Flash: If you're shooting inside a museum or at other "no-flash-allowed" events, use this. Use this if you want to shoot available-light-only events such as blowing out candles on a birthday cake.
Full Auto: Just let the camera decide ... and hope.
Basic Camera Practice & Controls
[most of the notes, below, are incomplete... as in "under construction"]
Shutter & Focusing:
Auto Focus: Auto focus modes and traits; conditions for each; switching AF modes.
Half-Pressed Shutter: focusing on off-centered subjects.
Manual focus; set auto/manual focus; focus ring on lens; tactics for discerning ideal focus.Light Meter and Basic Exposure Adjustments:
Intro to Exposure Issues and Terminology | Exposure
Your camera's light meter displays whether the current exposure/shutter/ISO settings will under-expose, correctly expose, or over-expose the image.
Explore info on our Exposure page to get familiar with the general tactics for adjusting exposures.Exposure Compensation:
(Over- and Under-exposing the image)
When you use one of the automatic exposure modes, you can adjust the exposure to allow more, or less light in — overexposing, or under exposing the image. Exposure compensation allows an experienced photographer to adjust for the general assumptions that the camera's computer must use.
White Balance:
Exposure Compensation:
Lens:
Attaching; Removing;
auto/manual focus btn;
aperture ring;
focus ring.
Focal Length/Zoom:
Minimum Focus Distance:
Lens Diameter/Filter Size:
Image Quality:
JPEG (Basic, Normal, Fine) + (image size)
RAW
Image Review:
Turn on image review mode.
Enlarge/Reduce
Pan
Scroll through images
Delete
Exposure Data:
Histogram:
Live View:
View your scene using the LCD screen on the camera back.
Use this only when the viewfinder isn't practical — such as when you have to hold the camera above your head in order to shoot over a crowd... or when you shooting down into the Grand Canyon by reaching out over the valley.
Avoid Live View because it drains your battery fast.
While Live View is on, the viewfinder mirror is flipped up -- so you won't be able to see anything through the viewfinder.
Memory Card & Image Transfer:
Nikons use SD memory cards. Canon's often use CF (Compact Flash) cards.
You can transfer images
a) using a USB cable between camera and computer
b) by removing the SD card and putting it into a card reader
c) by removing the SD card and using the built-in card reader on many newer computers.
Note: if you have no other image-organization strategy, put each new photo session into its own folder with a date and short-phrase description.
For myself, I do dates like "120101 New Years Party" for January 1, 2012) or "120704 Fireworks" for 2012 fourth of July fireworks. This date format allows any computer to sort my folders chronologically. I like that.
Tutorials and Resources
Course Home Page