Camera RAW
Week: 1 | 2 | 3 | 4 | 5 | 6 | 7 | 8 | 9 | 10 | 11 | 12 | 13 | 14 | 15 | 16
If you shoot images in RAW (NEF) format, you won't be able to open the images in Photoshop directly. If your computer has Photoshop installed, when you open a RAW file from Bridge or from the Finder, not Photoshop, but program Camera RAW opens. Camera RAW (CR) is considered a helper application for Photoshop specializing in handling images that have more depth of color and of value than can be displayed. You can use CR to prepare images for further editing in Photoshop. Frankly, however, all post-processing can sometimes be done in CR alone. CR is quite capable as an image editor. If you are not planning special effects or compositing or filters etc., then CR may be the only image editor you use.
Camera RAW is only one of several applications that can open, display and edit RAW format image files. You can google "camera RAW editor" and find alternatives — some of which can be used freely.
Adobe's Help/Tutorials for Camera RAW CC | A Good Intro to Camera RAW 7 (CS6) |
Open Images | Main Display | Basic | Curves | Color | Synchronize | Saving | To Photoshop | Chromatic Aberation | Other | Resources
Opening RAW images
Any time you open a RAW/NEF image on a computer with Adobe Photoshop installed, your computer will try to open Camera RAW (CR).
To open images in Bridge, you select images in the Content panel — the thumbnail images of your photos.
If you want to open multiple images, you can Command-Click on individual images to create a multi-selection.Once you've selected images, give the Open command.
(either File menu: Open or right-click, Open or Control-Click, Open )Note that once CR is open, you can't open more images in CR until you have closed CR using either the Cancel or the Done button. This is a bit odd, but you'll get used to it.
Main Display
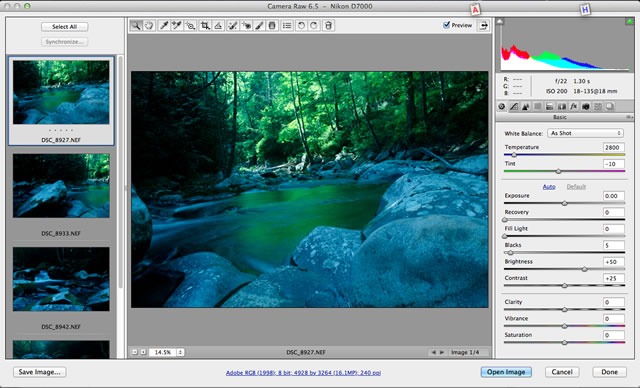
Main Camera Raw display, above:
On the left are thumbails of all open images. The current image is the highlighted thumbnail.
In the center is the main image display. Above that are basic editing tools similar to Photoshop's tools.
In the upper right is a histogram of RGB channels and basic exposure stats.
On the right is the Basic editing panel. (note the small icon/tab controlling which editing panel is shown.)
Basic Adjustments
When you start Camera RAW, the Basic editing panel will be open on the right side.
Get to know these Basic tools as they are the most commonly used global image editing tools you'll need.
White Balance: The upper portion deals with color balance. Feel free to explore the effect of changes in Tint and Temperature, but usually I'll leave this alone unless there are obvious white balance problems.
Exposure: increase or decrease the EV of the image. RAW images can be exposure-corrected far more freely than can images in Photoshop. The tonal data in a RAW image is "deeper" -- which is why professional photographers usually shoot RAW images, not JPG.
Recovery: Helps gracefully darken white/light areas that are "blown out" -- effectively too white or overexposed. Sometimes these can be recovered using a RAW image's deep data.
Fill Light: Helps bring back detail into dark regions that have dropped out and gone solid black. Again, RAW images store deeper image details about such areas than can be displayed.
Blacks: basically opposite to Fill Light, this darkens or blackens dark areas to better achieve a deep, rich black.
Brightness, Contrast: Standard tonal editing controls. I tend to not use these, since the other tools offer more focused control.
Clarity: accentuates tonal contrast between neighboring areas. Similar to Contrast.
Vibrance & Saturation: These manipulate color chroma. Saturation is more crude, frankly. Vibrance moderates the effect on lower-chroma colors, thus being a much better adjustment tool for images with flesh tones.
Curves
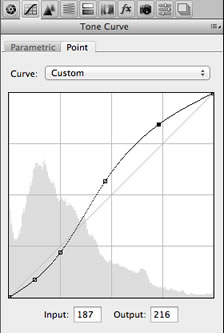
Curves, here as in Photoshop, offer you direct control of how tints, tones and shades are treated.
You can lighten or darken the values in any tonal region by raising or lower the curve in that tonal region. Raising lightens; lowering darkens.The curve shape is changed via the control points, somewhat similar to editing curves in Adobe Illustrator.
Tonal input regions are represented on the graph from left-to-right, from black-to-white.
Tonal output regions are represented on the graph from bottom-to-top, from black-to-white.Frankly, this has long been my favorite tonal editing tool. However, its a pain to explain in words. Once you've played with the curve and watched the resulting changes, you'll catch on and may like it as well.
Parametric tab: Allows you do control tonal regions via sliders rather than control points. (it may be easier to figure out what curves do in the Parametric panel. Give it a try.)
Color
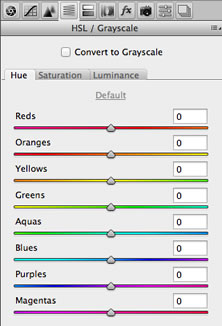
The HSL panel (Hue | Saturation (Chroma) | Luminance (Value)) offers tools to isolate particular ranges of hue, and alter those and only image areas with those colors.
The sliders allow you to influence pixels of a particular hue.
For instance, if you adjust the Orange slider, you thereby alter all portions of your image that are, to some degree, orange. Pixels that are purely orange in hue are effected most. Pixels that are nearly orange (yellow-orange or red-orange) are effected less.
Note the three panel tabs — Hue, Saturation and Luminance.
Altering Hues, shifts colors warmer or cooler, moving colors around the hue wheel. Thus, if altering orange pixels, you would make the orange pixels either more yellow, or more red.
Altering Saturation shifts colors richer or grayer in terms of chroma or saturation.
Altering Luminance shifts colors darker or lighter.
In practice you can change the character of an image a great deal using this panel. You can bring out particular objects by raising their chroma, or subdue their emphasis by lowering their chroma.
If you ware working to establish a particular color scheme, these tools can help you pull colors more effectively into that scheme.If you check "Convert to Grayscale", your image is converted to a black & white image and you can alter the image by lightening or darkening regions according their original hue.
Synchronizing Images
Camera Raw has a variety of tools that help you apply effects to a collection of images, as opposed to altering only one image at a time. This is a powerful capability, particularly if you've shot a lot of images under the same lighting conditions (say, at a wedding or other event) or if you want to introduce some special color/tonal effect to all of the images in a series.
The basic steps:
1) Load a set of image from a single photo shoot.
Do this by selecting multiple images in Bridge, then Open.
I usually don't open more than 8 or 10 images at a time because of memory issues. Occasionally I may open over 20 images, but don't try to open every image from a large photoshoot at once. See the note below "What if I have still more images to Synchronize?"2) Select one image that is representative of the group — an image that has typical color, contrast and exposure traits compared to the others.
3) Edit that image using any of CR's tools. Work to get the exposure, contrast and color traits as you want them. You likely should limit your edits to global edits — changes that effect the entire image, rather than techniques that require selecting specific portions of the image (i.e. local edits).
4) Select All of the images that you would like to adjust in the same way.
Make sure your corrrected image is selected.
You can use the "Select All" button near the upper left corner of the main CR window.
You can also Command-Click on individual thumbnails to select particular images.5) Click the "Synchronize" button near the upper left of the main CR window.
A dialog box will appear that asks you to specify exactly which traits from your edited image you would like to apply to the other selected images. Unless you know of particular traits you want to refrain from synchronizing, just click "OK".
The result is that any settings you used to refine your first image are now applied to all of the other images.You may now want to check each of the individual images to see if you want to make any further changes individually.
What if I have still more images to Synchronize?
If you've got more images from a shoot than can feasibly be loaded into CR at once, no worries.
After you've corrected (at least) one of your images, you can then click the Done button near the lower right corner. This will close CR and take you back to Bridge.
In Bridge you'll see your edited images updated to reflect the changes that you made.
To apply those changes to more unedited images...
...select one of your already edited images...
...then Command-Click on all of the other images that you'd like to edit...
...then Open. (either File menu: Open or right-click, Open or Control-Click, Open )This will open all of the selected RAW images in Camera Raw.
In CR select the already edited image.
Click "Select All".
Click "Synchronize..."
Saving (Exporting) Images
When editing an image in Camera RAW, the original image is never actually altered. Instead, CR creates a small file that is added to the same directory that your RAW image is stored in. This .exp file stores descriptions of the changes that you specified — so the RAW image is still raw and untouched, but the .exp file tells CR how to apply changes and edits.
(which means that if you ever want to get back to the true, from-the-camera RAW image, you can either delete the .exp file, or create a copy of the RAW file.)Because the RAW file remains untouched, and most image editors such as Photoshop can't actually open RAW images, you've got to export, or save, a copy of your image in another file format.
To save/export images, select one or more images from the left-side thumbnails. CR is optimized to handle saving many images at once.
Destination: tell CR where you want to save your image(s)
File Naming: CR will follow your instructions when naming files. You can add prefixes or suffixes to the original filename — or completely replace the original filenames.
You might include a project name or your initials or other info that will help you track what's in your image files.Format: CR will save JPEG, TIFF and Photoshop formats.
Digital Negative format is a non-proprietary RAW format that may become the standard RAW format for professional photography.
Use JPEG unless you have a reason to use one of the others.
Continue Editing in Photoshop
Click the Open Image button in the lower right corner of the main CR display in order to open the currently selected image(s) in Photoshop.
Chromatic Aberration
A common problem in high resolution images, particularly when shooting with cheaper lenses or at wide angles, is Chromatic Aberation.
WikiP | Nikon Intro | DPreview | PhotographyLife |The gist of the problem is that the camera's lens design does not focus red light, green light and blue light in precisely the same way. If you recall, optical refraction involves light being bent as it enters or leaves a lens surface (among other situations). Also, recall that each color of light bends (refracts) at a different angle. So, a big challenge within the craft of lens design, is enabling all colors of light passing through the lens to focus identically on the image sensor (or film).
In practice, there are often imperfections in lenses. The result is an image in which colors "shift" slightly in one direction or another, creating color fringes or narrow bands of color around the edges of objects in the image — that is chromatic aberation, or more strictly, its effect.The good news is that refraction is a predictable process and so software can, potentially, correct what the lens could not.
[Until I post more on this topic... read through this linked page: Correcting Chromatic Aberration
It offers good explanation, examples and presents the steps to follow in Camera RAW to correct chromatic aberration.]Other Camera Raw tools and panels
Tool Pallette (along the top of the main window)
White Point tool — pick a point in the image, declaring its white; adjust image white balance
Straighten/Rotate — draw a line along a horizon; CR rotates the image to make it horizontal.
Targeted Adjustment Tool — apply tonal/exposure effects to select regions of the image.
Crop Too l— crop (and rotate) the image.
Spot Removal — remove small spots and irregularities
Red-Eye Removal
Adjustment Brush Tool — apply tonal/exposure edits to select regions of the image.
Graduated Adjustment Too l— use a gradient to apply varying levels of tonal effects.
Rotate — Rotate the image by 90 degrees
Panels
Detail
Split Toning
Lens Correction — adjust for lens vignette problems or pincushion or barrel distortions.
Effects — Vignettes, grain...
Camera Callibration
Presets — allows you to save image corrections to apply in later worksessions.
Tutorials and Resources
Fix Chromatic Aberration in Camera RAW. This is Adobe's help page on the topic. Read this first. Deke's: Defringe Purple & Green Deke's Technique for removing Purple/Green fringing — which is a form of Chromatic Aberration. Adobe Site Help and Tutorials on Camera RAW Adobe's official introduction to and help for Camera RAW tools and features. This page describes the essential image editing tools in the Basic panel of Camera RAW.
Good content here.Adobe Camera RAW Tutorial Video... earlier version This is a good intro to some basic Camera RAW features, but it is clearly presenting an older version of CR with far fewer tools than are now available, but the critical tools appear to work as they do in CS6.
Video2 |