Exposure

Photography / Greg Clayton

Exposure is the fundamental act of photography — to expose film to light is to create an image.

Today we typically expose a digital sensor to light, rather than film, but film cameras persist and the history and traditions of photography are built on film. In either case, whether film or a sensor is in the camera, the instant of imagemaking involves an exposure to light. The quality of the image depends heavily on the nature of how that exposure to light is controlled.

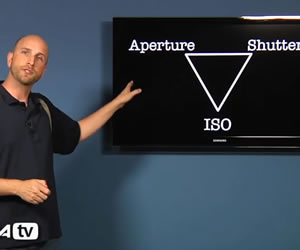
The Exposure Trinity are the three key technical components of an exposure.
They are aperture, shutter speed and ISO. Each plays a different but interrelated role in creating an exposure, or, more technically, an exposure value (EV).

Digital Photography 1 on 1: Episode 16: Exposure
adoramaTV

An introduction to the exposure triangle of Aperture, Shutter Speed and ISO.

Aperture: quantity of light allowed through
Shutter Speed: duration of light allowed through
ISO: sensitivity of film/sensor to light

Another helpful video intro to Exposure/thatNikonGuy


Each of these three exposure controls influences the amount of light that the sensor records. The challenge for new photographers is balancing all three exposure controls to get the best exposure.   Each exposure control alters image traits other than the quantity of light reaching the sensor.  The photographer needs to be familiar with the consequence of too much, or too little of each.  

An exposure value (EV) is a single number that describes receptivity to light. Many photographers know little or nothing about EV itself, instead focusing on its three components which may be set individually. However, the camera's onboard computer uses EV to handle all auto exposure calculations.

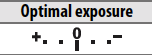
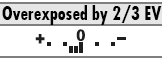
Aperture | Shutter Speed | ISO | Basic Corrections | Exposure Meter | Initial Adjustments
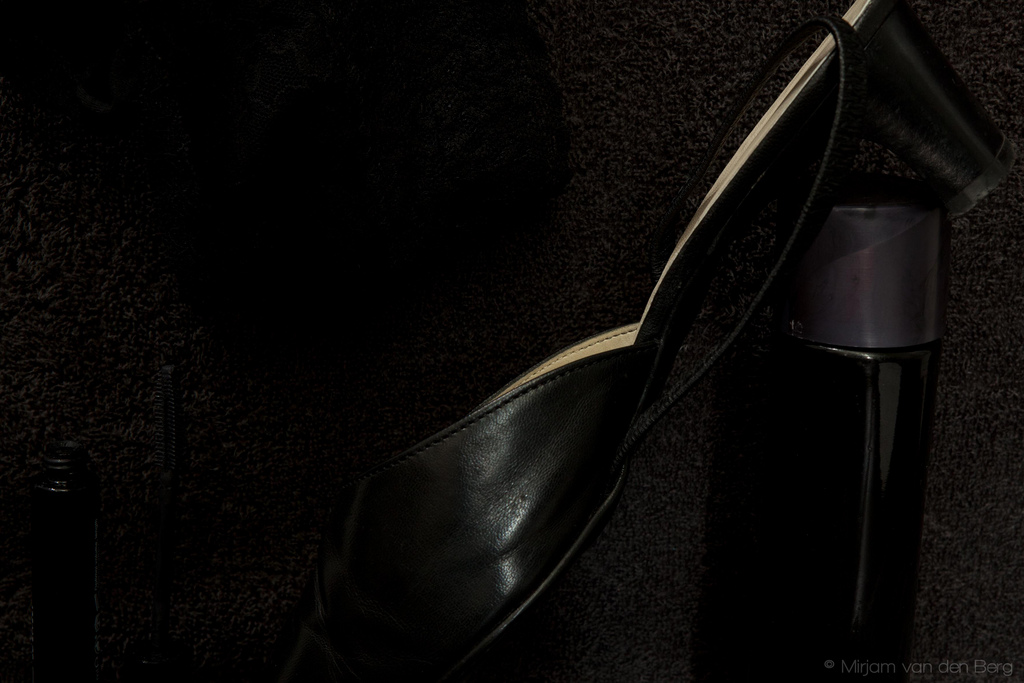
Exposure Compensation | Light Subjects | Dark Subjects | Depth of Field | Motion Blur

The Fourth Issue — Light, available, artificial, reflected...

The fourth issue, always, is light.
How much is available?
How well is the main subject illuminated?
Are critical area too illuminated? ...too dark?
The three exposure settings always depend on the light available to illuminate the photo's subject.

The correct exposure for a given situation depends ulimately on the amount of illumination available, combined with the tonality of subject matter and the photographer's expressive intent. The correct exposure, then, is a moving target that demands conscious attention by even the most experienced photographers.

Lighting of a subject is a key topic in photographic craft and art. Light has many traits other than intensity. Lighting color, direction, hardness or softness always influence a subject's appearance. Most subjects are illuminated by more than one light source, and usually by ambient light coming, generally, from all directions.


Exposure Settings: Basic Under- and Over-Exposure Corrections

With a digital SLR you can quickly check the results of your current settings by looking at the images you just shot in the preview window. You can make intuitive adjustments based on what you see — is this image too dark, or too light, or just right?
These are the most essential exposure questions.

To correct your exposure settings you've got the basic three issues: Aperture, Shutterspeed and ISO.

Exposure
Condition

Exposure Corrections

Image Symptoms

Exposure is too Dark

Underexposed

Do some combination of....
— Widen Aperture (use a lower f-stop)
— Slower Shutterspeed (a longer exposure)
— Higher ISO (more sensitive "film")
— Add illumination
(e.g. flash, strobes, move to sunshine, etc.)
(if using auto-exposure modes: increase exposure compensation)

— Main subject coloration is darker than intended.
— Dark areas are turning solid black, with no detail or definition.
— No white lights or highlights...highlights are gray or dim.
Exposure is Right  

Your primary subjects are correctly toned.
Hightlight burnout is eliminated or minimized.
Shadows include rich blacks, but also details.

Exposure is too Light

Overexposed
Do some combination of....
— Close Down Aperture (use a higher f-stop)
— Faster Shutterspeed (shorter exposure)
— Lower ISO
— Neutral Density Filter (ND)
(if using auto-exposure modes: decrease exposure compensation)
— Main subject's coloration is lighter than intended.
— White/Light areas are burned out.
— Deep shadow areas are gray rather than black


Built-in Light Meter

Ideally you have access to a dedicated light meter, but, in practice you'll more often have only your digital SLR and its built in light metering. (Through the lens metering/TTL) So, we'll work with that.

Your camera's exposure meter can be viewed through the viewfinder.

A digital SLR's viewfinder displays a lot of information.
Camera Manual PDFs:          D7000 Manual — p. 9      |        D90 Manual — p. 9


At the bottom center of the D7000 viewfinder is the Exposure Indicator (#19). This is your camera's on-board light meter.

Note: Some camera meters present underexposure on the left side, and overexposure on the right. Camera prefs often allow you to set this as you like.


Initial Exposure Setting Adjustments

When looking through your viewfinder, your meter will tell you whether your current exposure settings are adequate, slightly off, or very far from correct. You'll usually want your meter near the center zero position, (similar to 2, 3 or 4, below). If you've not assessed the tones in your subject for dominating darks or for dominating lights, then keep your meter at the center zero position.

When you're far underexposed or overexposed, check your exposure settings for extremes and reset them.

If you're far too underexposed...
... make sure your aperture is not too high.     (If you're at f20 or f22, then try f8 or so)
... make sure your shutterspeed is not too fast.     (if its set at 1/1000, then try 1/125)
... make sure your ISO is not too low.     (If its set at 100, then try 400 or 800)

If you're far too overexposed...
... make sure your aperture is not too low.     (If you're at f3.5 or f4.5, then try f8 or f11)
... make sure your shutterspeed is not too slow.     (if its set at 1/60, then try 1/125 or 1/250)
... make sure your ISO is not too high.     (If its set at 800 or 1600, then try 100 or 200)

Exposure Meter Adjustments
1 — Far too Underexposed Do some combination of....
— Widen Aperture (use a lower f-stop)
— Slower Shutterspeed
— Higher ISO
— Add illumination (flash, move to sunshine, etc.)
2 — Slightly Underexposed —  Decide if underexposure is best for your image. If not, use one or more of the techniques above.
3 — Correctly Exposed Assess whether subject matter needs either under or over exposure compensation to achieve intended image.
4 — Slightly Overexposed —  Decide if overexposure is best for your image. If not, use one or more of the techniques below.
5 — Far too Overexposed Do some combination of....
— Close Down Aperture (use a higher f-stop)
— Faster Shutterspeed
— Lower ISO
— Neutral Density Filter (ND)

Setting up Correct Manual Exposure

This video tutorial does a good job explaining and demonstrating how to set up a correct exposure in manual mode.


Exposure Compensation

"Exposure compensation is used to alter exposure from the value suggested by the camera, making pictures brighter or darker." (D7000 Manual, p. 107)

Adorama video tutorial on Exposure Compensation:
The initial example demonstrates how your camera's built-in exposure meter can be fooled by subjects dominated by light surfaces, or by dark surfaces. Using +2 and then -2 EV exposure compensation, light and dark subjects are exposed correctly.
Then a model is photographed — first wearing white clothing with white backdrop, and then wearing black clothing against black backdrop. Exposure compensation is used to correct for the dominant values in the frame.

If you develop one photographic skill for in-the-field, live shooting, develop the ability to adjust your camera's exposure compensation while looking through the viewfinder, framing images.

Contemporary SLRs provide controls at your fingertips for easily altering exposure compensation — you don't have to move your hand away from shooting position, the controls you need will be literally at your fingertips.


Nikon On: Exposure Bracketing: The Creative Insurance


Light Subject Matter


What if my subject matter really needs to be shot lighter in order to produce accurate tonality in my image?
What if I'm shooting images of a fresh snowfall — most of my subject matter is white.
What if I'm shooting a closeup of a bride's white wedding gown and veil.

Set Exposure Compensation to a positive value — e.g. +0.7 EV, +2.0 EV, etc.

If you are using an auto exposure mode (i.e. S, A, P), and you've set exposure compensation to + 0.7 EV, this tells your camera's exposure computer "read illumination using the camera's meter, and then lighten the exposure settings by increasing 0.7 EV." Until you readjust exposure compensation, every subsequent image will be shot with a 0.7 EV overexposure.

Strong Backlight

Another common photographic illumination problem is bright, light backlighting. Its not uncommon, for instance, to photograph a person standing against a bright sky. In such cases, you camera's meter reads that intense backlight, attempts to compensate for it by underexposing the image. The result is that your friend becomes underexposed and turns into a dark silhouette.

The solution is to either manually compensate by underexposing the image, or, tell the camera precisely which region of the scene should be metered.

Dark Subject Matter

 
Some rights reserved by susuzeck Original on Flickr   Some rights reserved by MirjamVandenberg Original on Flickr

What if my subject matter really needs to be shot darker in order to produce accurate tonality in my image?
What if I'm shooting the groom at a wedding —  he's wearing a black tux, has black hair and is standing against a dark background?
What if I'm shooting a stack of dark leather-bound books, all of them are black and dark blue and dark brown?

Set Exposure Compensation to a negative value — e.g. -0.3 EV, -1.7 EV, etc.

If you are using an auto exposure mode (i.e. S, A, P), and you've set exposure compensation to - 0.3 EV, this tells your camera's exposure computer "read illumination using the camera's meter, and then darken the exposure settings by decreasing 0.3 EV." Until you readjust exposure compensation, every subsequent image will be shot with a 0.7 EV underexposure.


Depth of Field (DOF) Exposure Adjustments

Another issue that influences selection of "correct" exposure settings is Depth of Field.
DOF is often considered an aesthetic issue rather than a fundamental exposure issue as it influences an image's sense of depth, its textural diversity and graphic emphasis and relief.

Depth of Field depends on optical effects of changing aperture.
The smaller the aperture (high f-stop values), the deeper the field of focus in an image.
The larger the aperture (small f-stops), the shallower the field of focus in the image — only a narrow region of depth will be in sharp focus and the rest of subject matter, nearer or farther than the focal region, will be soften or blurred to some degree.

When DOF is increased by closing down aperture, then the exposure must be adjusted by a slower shutterspeed, by higher ISO, or by adding illumination.

When DOF is decreased by opening up aperture, then the exposure must be adjusted by a faster shutterspeed, by lower ISO, by decreasing illumination, or by using neutral density filters.

DOF status Corrections Image Symptoms
Depth of Field is too Shallow

— Close Down Aperture
(use a higher f-stop; note that you'll need to compensate with a slower shutterspeed, and/or a higher ISO, and/or more illumination.)


A narrow focus field is sharp and well-focused, but other key subjects or edges in the image are not in focus.
DOF is fine   For expressive intent and for emphasis, the appropriate forms are sharp.
Depth of Field is too Deep — Widen Aperture
(use a lower f-stop; note that you'll need to compensate with a faster shutterspeed, and/or a lower ISO, and/or ND filters or less illumination.)
Everything in the image is in sharp focus —  which is sometimes aesthetically undesireable.


Motion Blur and Exposure Settings

In general, photographic images are expected to "freeze" a moment in time. In practice, there are situations in which a blur of fast-moving forms adds expressive and graphic character to an image.

The primary exposure setting influencing motion blur is shutterspeed.
The faster (short, more brief) the shutterspeed, the more frozen and sharp the image will be.
The slower (longer duration) the shutterspeed, the more motion blur will occur from either the subject moving, the camera moving, or both.

Motion Blur Corrections Image Symptoms
Unwanted Motion Blur

— Faster Shutterspeed
(you'll need to compensate with wider aperture, a higher ISO, or more illumination.)


Subjects intended to be frozen and sharp, are blurred due to subject movement or camera movement.
Focus is fine    
Motion is too frozen or crisp

— Slower Shutterspeed
(you'll need to compensate with smaller aperture, a lower ISO, ND filters, or less illumination.)

Some subjects benefit from softness and from motion blur.


Articles and Links

Cambridge Photo — Exposure Tutorial


Art 265 Home Page | Schedule | Projects |


Greg Clayton
2D Design
Color Theory

Back

 
Photography Course
 
Course Schedule
Course Schedule
 
Independent Study