Create a lower-resolution version (2Mpix) of your images for uploading to DropBox
a) Why?
This will create a smaller file, thus requiring less space on your DropBox volume.
This will upload to DropBox faster.
This will display/download faster when we view images in class.
As long as you save a Photoshop version (.psd) of your image, all editing techniques will stored as a part of the file, even if you reduce the image size. Thus, we can open your file and see how you edited and organized your image — we can access your image layers, your adjustment layers and masks and settings.
b) How to make a smaller version of my image?
— Save your finished, edited image.
This will be your permanant, full-resolution file that you'll keep on your own disk. You usually won't need to turn it in for a grade, but if you do need to edit your image further, edit this original, full-size file and then repeat the following steps to recreate a smaller file for grading and in-class crit/review.
— Image(menu): Image Size...
This dialog allows you to down-sample your image — to make it smaller, with fewer pixels of data, thus creating a smaller file.
The key factors here are:
Pixel Dimensions:
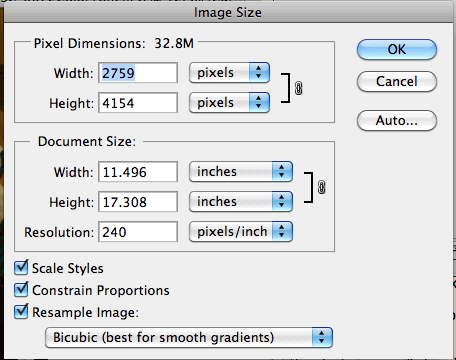
The overall image currently requires over 32 Megabytes of data. ( 32.8M ) Thats a pretty big file.
This particular file is a 12Megapixel image with a couple of adjustment layers in Photoshop. Your file will likely be a different size.
You can't change this value directly, but you can change it by altering Width and Height.
Width & Height: the number of pixels in this image from side-to-side, and top-to-bottom.
Make your changes:
— Make sure that "Resample Image" is CHECKED
(otherwise you'll just reset the image's Resolution, not the quantity of pixels in the image.)
— Select "Bicubic Sharper" as your resampling technique.
(this effects the way that Photoshop calculates the colors and image qualities of your resized image.)
We want to create an image that has roughly 2
megapixels.
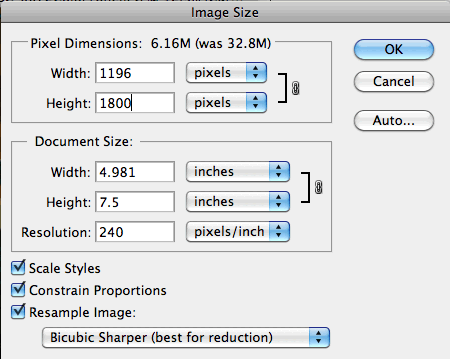
— In either the Width or Height field, type 1800
Use whichever field is larger...
...
if you've got a vertical image, edit the Height....
...
If you've got a horizontal image, use the Width field.
When you edit the Width or Height field and "Resample Image" is selected, Photoshop will automatically calculate the other field.
Here, in the example above, I entered Height = 1800.
Photoshop then reset Width to 1196.
Multiply Width x Height to get 2,152,800 — so our new image has just over 2 million pixels and is thus considered a 2megapixel image.
— Click OK (enter/return) to invoke your changes.
Save As Your Downsized Image:
— File(menu): Save As...
— Revise your filename in a way that conveys how this image is different than your original, fullsize image.
If your original image was named: MyProjectGLC.psd *
Rename this one: MyProjectGLC_2M.psd
That is, just add a suffix to your current filename that reminds you that the image in this file is the 2Megapixel version of your original image file. By keeping the first part of the filename the same as the original, your new and your old file will show up in Bridge and in the Finder right next to each other. This is a helpful, simple strategy to keep your image files organized.
* Also, for files you'll be turning in this course, include your initials somewhere in the filename.
That will help us keep track of whose files are whose.
— if assigned, copy those images to your DropBox Art265_Photography folder.
Photoshop Top 40 with Deke McClelland