Goals & Concept
One of the many product-shot specialities is Food Shots. Think about how many print, billboard and video ads promote food. Lots.
You may think its easy to make a Big Mac* look appetizing, but, no, even good food needs skill and attention to make the viewer salivate.
(*or your Café Mocha, crepe suzette or fresh sushi… )Here you will plan, set up and shoot images of food. Then you will lay out several final format designs — ads to promote food or a restaurant or layouts of a magazine cover or similar.
The Short Version
You will shoot images of food for several different Final Formats — to be assigned from these options.
A/ Culinary Magazine Cover B/ Full Page Ad
C/ 2-Pg Magazine Article Lead D/ 1/3height Magazine Spread
E/ Bilboard F/ Fine Art
G/ Cookbook Spread
The style and characteristics of the images will be based on a "source image" or on traits identified in several source images.
For each of the Final Formats:
Draft Images and Production Notes:
Shoot 10+ draft images for each final format using props as stand-ins for food.
Sketch and write notes on your lighting setup, exposure settings, composition and food prep.
Working Shots:
Shoot at least 15+ images attempting to capture your intended lighting & composition.
Edited Images:
Post-Process at least 3+ of your working shots. Use any and all editing techniques to better capture the traits of your source image.
Showcase Image:
Select one of your edited images as your best example for your format.
Include:
a) the unedited image,
b) the final edited image and
c) the comprehensive final layout using your image.
d) notes and sketches from production process.
Upload to Google+ Art265_Photography
Include at least 5 of your unedited working shots.
Upload your Edited and Final Image sets.
Add descriptive comments to your Final Image explaining your goals. Include a link to your source image.
Final Formats — the layouts that the images are for.
Food photos are most often for commercial applications — for ads, for culinary blogs, for cookbooks, for magazine illustrations, etc.
For this project you will select, or be assigned, three Final Formats.
You will shoot food-products to be used in each of those Final Formats.
You may be assigned to shoot the same food for all of the formats, or you might be assigned to use different types of food — pay attention to the assignment given in class or on your schedule. In either case, you'll be recomposing and likely, relighting your shots so that your images can be used in several different formats.In practice, some of your images will be tall, some very wide and short, and some may be squarish.
Some of your images can be composed to fill the frame with detail.
Others of your images must be composed to provide simple relief areas so that type — headlines or other copy — can be overlaid on the image.The Final Formats will be assigned from these:
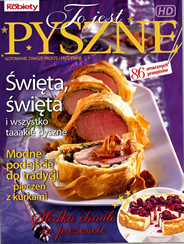
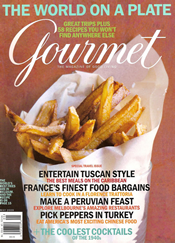
A) Culinary Magazine Cover,
You will match the textual content, headings and general layout of an existing culinary magazine that you choose. Select a magazine layout that uses the full cover for the photo, as in the examples below.
You will shoot your own food shot to work within the cover layout.
You will use Illustrator, Photoshop, InDesign (etc.) to lay out type to create your completed cover design.
You will turn in (at least):
a) A jpg of the culinary magazine that you've selected as your source.
You do NOT have to match the food or food shot itself — you can select the food and props.
You DO need to match the layout, type and general color traits of the magazine. In effect, you are shooting an image to be used for this magazine — for your source magazine layout.
b) unedited image (jpg of an unedited version of your final photo)
c) your final edited image (the image that you use in your magazine cover layout.)
d) Showcae Image: a jpg of your own Culinary Magazine layout. This is your edited image along with type, etc. added to match the magazine layout. Create this in whatever page layout application you are most comfortable with.
B) full page ad
(generally base the textual content on an existing ad)C) two page magazine spread for the beginning of an article
(200 words of copy, plus headings and credits)D) a 1/3-height magazine spread.
( very wide but short format, typically along the bottom edge or the top edge of a magazine spread.)F) Fine Art Image
Consider a still life study in which the entire visual field is well composed with light and shadow controlled well.
Consider a Surrealist image created by choosing disparate objects, or by using compositing or post-processing effects.G) a two page spread for a cookbook.
This shot must match the style and character of a group-cookbook. That is, everyone in class will discuss and propose ideas for a cookbook format. You’ll decide on a particular layout and graphic style. Each participant in the project will set up a shot to match the specs and style of the cookbook.
Select your Source Images
For this project, you may be assigned Reference Images, or you may be allowed to find and propose source images. We'll work that out in class. We'll look over ads, web sites and food blogs, cook books, restaurant print and web menus, magazine covers, billboards and possibly video — food images show up in a lot of contexts.
For now, get to know the territory — start looking at food photography as photos, not as food. Stop salivating and start thinking lighting, exposure, composition, post-processing and food-enhancement.
Look for what impresses you and draws you in.
Then think analytically about what is needed to create such images.Start by finding your role models — whose food shots do you want to emulate?
Any time you shoot a new type of imagery, there is a break-in period during which every image tends to look the same. Get past that by looking... and looking some more.
Explore images and until you can see the differences between each photographer's results.Award-Winning 2014 | Penny de Los Santos | GastroPhotoNomia | Food Blog Awards | Daniel Krieger | Brenda Spaude |
Planning and Draft Images: Before the food arrives...
Because food is, well, food, it won’t stay around in prime condition for long.
You’ve got to plan and set up your shot before the food is ready, and then shoot quickly while food is in prime condition.
That takes planning.You’ll likely need to set up some test shots using stand-in props beforehand.
Begin by exploring what experienced Food Photographers have to say about their craft.
Food Photography Tutorial Links by topic | National Geographic Food Tips |
Lighting & Styling | Lighting | Lighting Tips | Tips | Artificial Lighting |
Intro | Camera Angles | Basics |
Interview with Jed Alder | 44 Beyond Food Photo Blog |
Explore these sites, above, and be ready to talk about...
What are the problems specific to food photography?
What factors do you have to remember to pay close attention to that you don't often have to think about?What kind of planning do the pros suggest?
What tricks or tactics do the pros use to enhance their food imagery?
What are the lighting issues, and solutions, suggested by the pros?
Test Shots & Planning:
Shoot 10+ draft images, usually not using the actual food.
Non-perishable props may be used to figure out lighting and composition.
Shoot a set of draft images for each final format.
The goal is to be able to position and shoot your final subject (food) quickly once its available.Write notes on...
— plans for exposure,
— lighting (sketch lighting plans),
— composition (create thumbnail sketches initially and then mark up prints of draft images)
— special preparations (what is needed to make the food appear moist or hot or rich in color?)
— post-processing (plan any cleanup or enhancements, compositing or type-placements
Working Images
Shoot at least 15+ images for each final format.
In practice, this is very few. Its always best to shoot more so that when you move on to post-processing, you've got plenty of options to pick from.You'll select lighting, exposures, backdrops, point of view, cropping, composition and special food-prep in order to create images that reflect your source images.
Your images do not have to use lighting, poses or composition that are identical to that of your source images.
You do, however, need to think about the traits that enable your source image to look and feel as it does — what are the traits that are involved?
Pay close attention to lighting and exposure — work to think through these and emulate these closely
Know what you are aiming for.
You'll be expected to describe these traits in the comments for your uploaded final images.
Edited Images
Complete post-processing on at least 3+ images for each final format.
The goal here is to recognize which aspects of the image involve image editing, versus those aspects that have to be planned and executed when shooting the image.
Color, contrast, general exposure refinements can be altered. Masks might localize tonal/color changes. Final cropping is often needed. Touchup or cleanup may be needed.
Compositing may be needed.You'll need to lay out your final format — at least a draft version of the final layout. Select type, type placement, color and any other graphics that will be combined with your image.
In Design, Illustrator or Photoshop are you most likely tools here.Make notes on the steps you take — keep a record of the edits and include those notes in the comments for your uploaded images.
Showcase Image
Thoroughly refine and, if needed, retouch at least 1 image from each set to be your most successful example of emulating your source image.
It may be that your three Edited Images are great, and you just have to choose one of them. It may be that more refinements are needed. In any case, chose carefully and be able to justify the choice — know why you chose the one you chose.Include the unedited original, the edited image, and a jpg of the composite of your final layout. (e.g. the magazine ad, billboard, etc. Whatever your final format is.)
Upload to Google+ and Document your Showcase Images
Create an album for "Food Shot 1", "Food Shot 2" and "Food Shot 3" -- that is, create an album for each set of photos.
In each album:
— Upload at least 5 of your unedited Working Shots.
— Upload your 3+ Edited Images
— Upload your Showcase Image (which is, of course, one of your Edited Images) Include the unedited original, the edited image, and a jpg of the composite of your final layout.Document your Goals and Methods:
— Add comments to (at least) your Showcase Image.
— Include a link to your Source Image(s).
— Upload a sketch of your lighting layout with adequate notes on lighting power, modifiers, distances, etc.
— Describe the traits that make your Source Image(s) distinctive — what qualities or features make it unique?
— Describe your preparation and setup for shooting your images.
— Describe your post-processing — what were the key adjustments you made once you got into Camera Raw and Photoshop?
— Describe the traits that you most successfully emulated. In what ways is your image very much like your source image?
— Describe the traits that were not fully successfully emulated. In what ways is your image really not like your source image?
— Describe what might be needed to create a more successful emulation of your source image. If you had the equipment, the setting and the skill, what might be needed to more closely duplicate the qualities of your source image?
Copy the URL of your Source image into your comments.
If you can directly "copy image" from a web page, do so and paste that into your G+ comments or message.
If not then...
You may need to open the specific image you've chosen, then...
(Win) Right-Click and select "Copy Link Address" from the pop-up menu.
or
(Mac) Control-Click on the image then select "Copy Image URL" from the pop-up menu.Paste that link into the comments of your Google+ image.
The link will look something like this: http://jeremycowart.com/new-blog/wp-content/uploads/2013/08/29_Shirock_78141.jpg


