Photographs record light.
Period.
Thus, control over lighting offers the photographer control over the final image.
Often we work with available light — the sun, ambient light, firelight or available artificial lights. Our knowledge of varied exposure tactics offer us many options for making use of available lighting, but, there are, admittedly, times when we want to control illumination as well as subject as well as the camera and exposure settings.
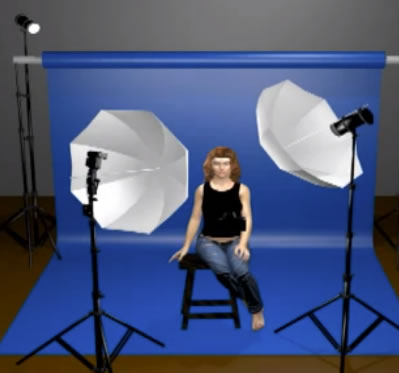
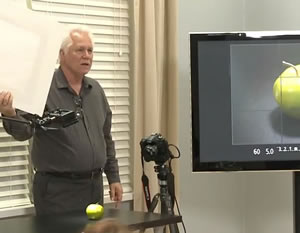
Studio lighting — strobes, reflectors, diffusers and so forth — offers us that control.
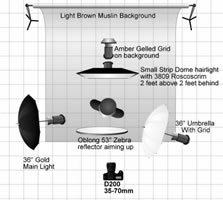
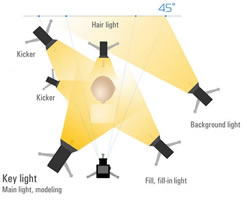
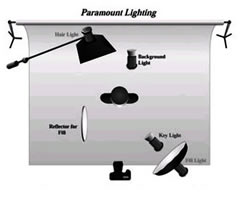
As these lighting setup diagrams, above, suggest, combinations and arrangements can get complex.
The basics of lighting are fairly straightforward, the possibilities are endless. Though there are techical exposure and synching issues, creative exploration is, finally, the determinant of the best solution for a given situation.Getting Started: Connecting Strobes | Camera Setup | HU Lighting Equipment
Where to Put the Lights: Lighting Intro | Single Light Setups | Two Light Setups | Three Light Setups
Altering Light Qualities: Light Modifiers | Colored Lights | Hard vs. Diffuse | Tents & Cubes |
Flicker Tutorials: lighting1 | lighting2 | lighting3 | lighting4 | lighting5 | lighting6 | lighting7 | lighting8 |
Connecting Flashes & Strobes
When there isn’t enough light, or if we want to have more control over our image, we use flashes and strobes. Here is some information that you may find helpful when using the department’s flashes and/or strobes.
HOW TO CONNECT THE CAMERA WITH THE FLASH — the hot shoe.
Flash units have a connection on the bottom designed to directly mount to the camera.
The camera's flash connection is called the hot shoe. The hot shoe is located on top of the camera above the viewfinder. The hot shoe’s job is not only to physically secure the flash to the camera, but to transfer information to the flash and trigger it — it is an electrical connection as well as a physical mount. The information that is transmitted is called TTL (Through The Lens). TTL is the information about what shutter speed, aperture, and ISO the camera is set on as well as information from the light meter about the illumination of the scene. The camera’s computer calculates all this information and sends a signal to the flash telling it how much light it needs. TTL is the automatic setting for the flash unit. In manual mode you, the photographer, will have to tell the flash how much light you want for the image. Flashes can also be connected by a cord to the camera. This comes in handy if you don’t want the flash to be located close to the lens. These cords have a hot shoe on one end for the flash and, on the other end, will either connect to the hot shoe on the camera or through the camera’s flash sync port.
Another option for “off camera flash” is a radio transmitter. These involve two small devices; one mounts on the camera’s hot shoe and the other to the flash. As you can guess from the name, these devices transmit the information from the camera to the flash through radio waves.SOME THINGS YOU WILL NEED TO KNOW
1) Flashes are not always as fast as the camera’s shutter speed. There is a maximum speed for each flash. If your image is partially lit and partially dark then your shutter speed is too fast for your flash. Each flash is different and the better ones have a faster sync speed. Usually a shutter speed of 1/125 or slower is safe. Some flashes can sync up to 1/1000 of a sec. Off camera flashes can be limited by the information transfer speed of the device used to trigger the flash. For instance, a high end flash may be able to sync with a camera at 1/1000th sec but if the wireless transmitter can only transmit the signal at 1/250th sec then the flash is limited by the transmitter. Consult the owner’s manuals for specifications.
2) You will need to set your white balance to “flash.” This is usually designated by a lightning bolt symbol. This tells the camera that it will need to be sending information to the flash and that it will need to compensate its white balance to the light coming from the flash.
3) Syncing through the flash sync outlet is sometimes required in older analogue cameras. Even though these cameras have a hot-shoe-like mount for a flash, they do not have the electrical connections on the hot shoe to transfer data. If you are syncing through the camera's flash sync port you will need to locate the lightning bolt icon usually located on the left side of the camera. It will be an 1/8th inch jack size (the size used for head phones). In older analogue cameras the sync port is usually located next to the lens and is designated by an “X” and will require a different connection wire than the digital camera’s 1/8th jack size.
4) Light diminishes over distance — the farther your subject, the less illumination your flash offers. If your flash is too far away from your subject, then the flash will not illuminate the subject fully. That is one of the reasons why objects closer to the camera will be overexposed and other subjects further away may be underexposed. Light from the flash is dispersed in a wide arch and will be weaker farther out than closer to the flash. Some flashes can partially compensate for this if they have a zoom capability. Some manufacturers will give their higher end flashes the capability to concentrate their light in a smaller arch in order to concentrate more light further away — more like a spot light. This information is transmitted through TTL to the flash or it can be controlled manually.External SLR Flash Intro | DPTips Flash Intro |
STROBES
Strobes are another lighting option and are usually used in studio environments. Sometimes they are taken out to the field and hooked up with battery packs but that is beyond the scope of this class. Strobes provide more light and options for controlling that light than flashes. They usually can sync faster with a camera’s shutter speed as well.
SOME THINGS YOU WILL NEED TO KNOW ABOUT STROBES
LIGHT BULBS
Do NOT touch the light bulb in the strobe. They are expensive, high performance bulbs that can and will blow merely from the oil on your hands. So be careful when handling and moving them to not touch the bulb — use a soft cloth or cotten gloves to handle bulbs. Even though they last a long time, if you suspect that the bulb is burned out then contact one of the professors and let them change it for you.
WAYS TO CONNECT TO CAMERA
There are two ways to connect the strobe(s) to your camera.
One is through the radio transmitter discussed in the section under “Flash.” Connect the transmitter to your camera’s hot shoe and the receiver to the strobe through the 1/8th inch jack cord. Make sure the transmitter and receiver are turned on and are both on the same frequency channel (see RADIO TRANSMITTERS/RECEIVERS).
The second way to connect your camera to the strobe is through the flash tether cord. One end goes into your camera’s sync outlet and the other into the strobe’s 1/8th inch outlet.
NOTE: Power up the camera first, then the strobe, then the wireless transmitter/receiver (if using a wireless option). Sometimes the camera will not recognize the transmitter/receiver if they are powered up before the camera.
WHITE BALANCE
Just like with the flash, make sure your camera’s white balance is turned to “flash” (the lightning bolt).
CHANGING FLASH POWER — how much illumination do you want?
Most studio light sources offer intensity adjustments so that the light can be bright and intense, or gentle and dim, or anywhere in between. This allows photographers more control over exposure settings and over the relative highlight and shadow regions.
The strobe will have a dial or slider to adjust how much light it puts out. These are usually measured in quarters or eighths of "full strength". Strobe units vary in their maximum illumination capacity.
If you need more light, turn it up; if less, then turn the dial down.NO TTL INFO FOR STROBE
Strobes do not access TTL information. They usually are fully manual. So it is up to you to know how much light you want and to tell the strobe. Some wireless transmitters are sophisticated enough to transmit and control strobes power output through TTL but we do not have these (very expensive) transmitters.SYNCING MORE THAN ONE STROBE
If you are wanting to use more than one strobe do not worry, you still only need one sync cord.
Flash and Strobe units can be synched — meaning that, when one fires, all fire simultaneously.
The strobes the department has are slave capable meaning that the strobe you connect your camera to will be considered as the master and will trigger the other strobes telling them to fire as well. They sync together almost instantaneously through the flash of the master strobe, so be sure to have your other strobes in direct line of sight with the master strobes light or else they will not fire along with the master strobe.MODELING/PREVIEW LAMP
If you want to know where the light is pointing, and how it will effect your subject, then turn on the strobe’s modeling light.
This light is designed to be continuously on when the “model light” mode is enabled allowing you to see the direction and effect the strobe will have on your subject. It is not, however, as brilliant as the strobe, the modeling lamp is just meant to provide an idea of how the strobe will illuminate your subject.NO “STROBING”
Our strobes are really glorified flashes and are NOT meant to be repeatedly fired in quick succession (true “strobes”). Each strobe unit requires time to recharge before it can again be refired. The recharge time varies between a fractino of a second, and several seconds. Fast, repetitious firing can and will damage the light bulb and strobe unit. There is a small light at the back of the strobe that will turn on when the strobe is fully charged and ready for another fire. An audible beep will also accompany this light to let you know that the strobe is ready for another fire. The RED light and audible beep means that the strobe is at 80% power, the green light means the strobe is at 100% power.
Shooting Modes and Camera Setup
Shooting in the studio is very different than shooting in other situations. In those other situations you can not control the light that you have as much as you can in a studio. In the studio you have control not only over your camera's settings but also complete control over the lighting. This allows for some very unusual camera settings. Even though each setting will depend on the look that you are going for here are some basic places to start.
Shooting Mode:
Manual mode is often preferred once an initial exposure is established.
Typically you'll set your shutter speed at 1/125.
Set ISO at 100.
Try an aperture of f/8.
These settings won't give you a good exposure — only a starting point.If you're shooting with a Speedlight on TTL, shoot an image and begin adjusting a) flash intensity and/or b) aperture. You can also adjust ISO, but begin with adjustments to flash or aperture.
If you're shooting your camera in Manual Mode, and your flash in manual mode, you'll also adjust flash intensities and then apertures.
If your images are dark, you increase the intensity of your flash and/or use a smaller (higher) aperture. If your test images are overexposed, you decrease the intensity of your flash and/or use a larger (lower) aperture.
Exposure Settings
ISO/QUALITYIf you are shooting in a studio, you are probably shooting for something really concerned with quality.
Therefor keep your ISO low (200 or less, 100 is even better).
SHUTTER SPEEDThe shutter speed has some limitations according to the flash and strobes (See #1 under "Flashes" at the top of this page). As long as your shutter speed isn't too fast for your flash or strobe and is fast enough to keep your images from blurring you'll be fine. In practice this is between 1/60 (unless on a tripod) and the max sync speed of your flash (1/250?).
APERTURESince you are in a studio you will probably be more concerned with your depth of field. There is a limit that you will "need" for your subject to remain sharp. A setting around f/8 is a good place to start. It gives a large enough depth of field for objects to remain sharp. Anything larger will be concerned with a depth of field larger than the constraints of your studio. At the same time it doesn't matter if you go higher (smaller aperture) if you need less light. If you are wanting a shallow depth of field then just adjust your shutter speed and/or ISO and/or lights.
RECAPSome good photographers keep their cameras on a specific setting and just change their lights and aperture. This is usually an ISO of 100, SS of 1/125, and they will change their lights and aperture to get the look they want.
Light Sources
Three Rules of Lighting for Photography: video tutorial
1) Light travels in straight paths;
2) Illumination diminishes with distance:
3) The larger the light source, the softer the light quality.Where to put the Lights? Adorama tutorial on Positioning Light Sources in order to get preferred light and shadow qualities.
Compares front light, side light, and back light.
Compares level lighting, low lighting, high lighting, 45 degrees in front, 45 degrees behind, left backlight, right backlight, etc.Studio Lighting Techniques/Digital Camera World | Lighting Tips from the (Old) Masters |
Single Light Source Setups
Over-the-camera and built-in flash
Most consumer cameras include a built-in, pop-up flash above the viewfinder. Most pro cameras do not. Why? Non-photographers own as little camera equipment as possible, and want a tolerable solution for everything. Pro photographers are willing to purchase, maintain and coordinate whatever equipment will offer the greatest control over image traits and image quality.
The problem with the built-in flash is that the light source is much too close to the lens. Your illumination source is directly in front of the subject, rather than offset to either side. Thus, shadows are neither left nor right; highlights on forms are on planes directly facing the camera. This creates very flat forms and often harsh highlights.
Flash as Fill LIght
Nikon: Photography Lighting Tutorial: Control of Color1
Here is nice video on On-Location shooting, relying primarily on available light and then using flash as fill light. Explains how to use the camera's auto exposure meter to determine the best initial settings. He also adjusts white balance to alter effects.
He varies flash settings to alter the overall aesthetic of the image. He goes on to use colored filters, diffusers and reflectors to get still more control over illumination. Some of the tactics depend on access to a speedlight flash system.
Note that he first figures out the ideal lighting setup, and then finalizes composition, expression and gesture.
Note also that he has a team of 3 assistants to help get what he's after.Nikon: Photography Lighting Tutorial: Control of Color2
This followup lighting tutorial focuses more fully on color control. He again, is using a professional level flash system.Nikon: Using Speedlights to create a Strobe Effect
Single Strobe
Adorama tutorial: 7 ways to shoot flattering portrait photography with a single flash.
Sample images, lighting positioning and general lighting/exposure advice for simple but effective setups.
The Basics of a One Light Setup: A Lighting Tutorial
TheSlantedLens & J.P. Morgan (7.12)This is a really well done lighting intro with explanation and demonstration of the fundamental visual issues.
Core
Fill Shadow
Highlight
Highlight-Fill Ratio
Rembrandt
Highlight and shadow side of face
Highlight and shadow side of backdrop
Keylight, Soft Box,
One Light Portrait Setup
by Ed Verosky/EdVerosky.netUsing One Light source to Create a Classic Portrait.
Initial exposure:
Typical ISO: 100
Aperture: f/4.0
Speed: 1/250Ed offers a good walkthrough of exposure, lighting and subject-position refinements.
PDF: Ed Verosky's Mini-Guide to Off-Camera Flash
Video: (setup of ) Off-Camera Lighting for Small Flash Unit
Single Light Portrait Setup using a key light with diffuser, and a hand-held reflector.
by Kerry GarrisonThis is a good, practical, basic intro.
B&H Getting Started with Softboxes
Larry BeckerBasic practices and issues using softboxes to spread and diffuse illumination.
B&H Direction of Light: Your Key to Better Portrait Photography
Neil van Niekerk (1hr40min)"It is all about the direction and the quality of the light....the direction and quality of light. Once you recognize this aspect of photography and lighting, then the door is wide open for you to be able to use any light source comfortably."
This workshop presentation covers what van Niekerk has learned about the significance of the direction lighting in relation to the subject.
Portrait Lighting
TheSlantedLens (8.10)This is a very nice, efficient demonstration of five different lighting setups for portraits.
Check it out.Portrait Position
Rembrandt Light
Split Light
Broad Light
Butterfly Light/Paramount Light
Loop Light
Eye Highlight
Key Light, High Light, Fill Light, Rim Light, Back Light
Bounce Flash
Two Light Setups
Two lights typically offer either a key and fill light, or a key and back light.
You can easily expand by adding a reflector to create fill light using illumination reflected from the key light, effectively achieving a three light setup.
Two Light Portrait Setup
Kerry GarrisonKey Light
Fill Light
ReflectorBasic Lighting & Metering
tomonator60Basic Lighting & Metering/Key/Fill
tomonator60Good info on what to look for when setting up lighting. (Audio and video are weak, but content is good.) Explains why a fill light is needed in order to contain the dynamic range of the image. "You need enough fill to soften the shadow, but not eliminate the direction of the key light."
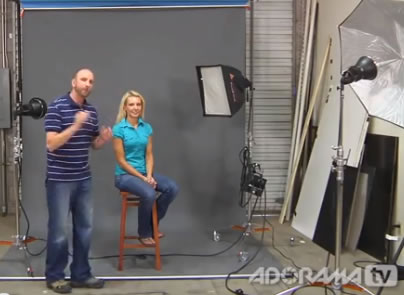
AdoramaTV tutorial on a simple 2-light studio portrait setup.
Mark Wallace/AdoramaTV
Describes how a diffuse strobe is use in front and above the subject. Also using a grid-light to provide separation light on the backdrop.Three Light Setups
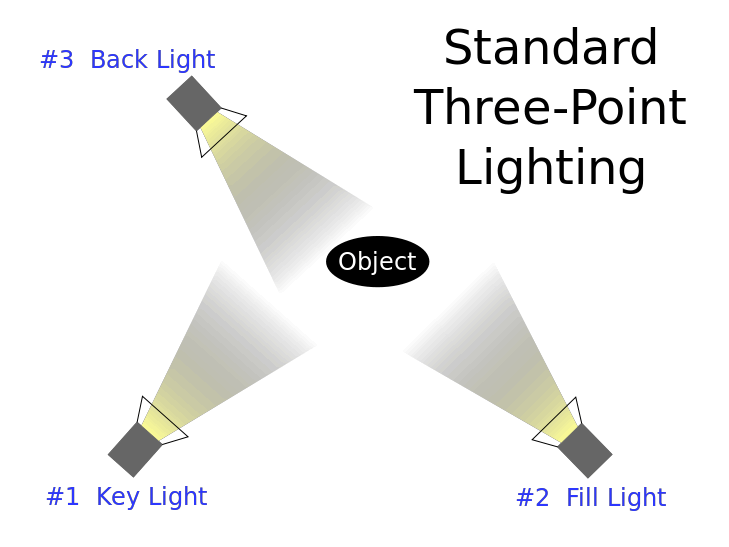
A common general lighting setup involves a key light, a fill light and a backlight.
The key light is provides the main illumination of the subject.
The fill light offers illumination to surfaces turned away from the keylight, providing a better ratio of light and dark tones.
The back light either illuminates the background (or backdrop), or is used on the back of the subject (hair light or rim light) — often aiming to creating rim lighting.Three-Point Lighting for Portrait Photography
by Ed VeroskyAn overview of classic three-point lighting setup used in portrait photography.
Using Main Light, Fill Light, & Backlight.Note his process of building up the lighting, one light at a time in order to maintain control. This insight into setting up the relative intensity of the various lights is very practical — check it out.
Three Point Lighting Tutorial
SmickPhoto
He demonstrates three different setups using varied arrangements of three light sources.
Key Light, Fill Light and Hair Light
Six Traditional Studio Lighting Setups
AdoramaTV (13.32)Broad Light via umbrellas, reflectors or soft box, illuminating the major planes of of the subject.
Short Light, illuminating the foreshortened planes of the face produces highlights along an edge of the face.
Loop Light
Closed Loop Light
Rembrandt Light
Butterfly Light
FramedNetwork.com/Flix/LitUp Lighting Series | YouTube
Joel Grimes16 Video Episodes explore lighting issues, tactics and effects.
"A technical instrument can never make a creative decision."
Joel GrimesMost or all of these videos are on YouTube, but a free subscription on FramedNetwork will get you access to these very nice discussions of, and demonstrations of lighting tactics and effects.
(connect via FramedNetwork to skip YouTube ads)Three Light Portrait Setup
Kerry GarrisonBuild up lighting, one at a time to get intended effects.
Key Light
Fill Light
Back Light
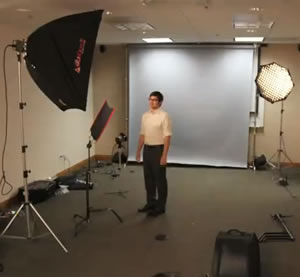
Simple Corporate Portraits: A Lighting Tutorial
TheSlantedLens/J.P. Morgan (5.30)Explores the full setup, shooting and takedown of a day of portrait photos, including the progressive setup of lighting and lighting options. Very practical.
3 Point Lighting Tutorial
Lincoshop
Another useful intro to the basic roles of the key, fill and back light.
_________________________Three Point Lighting Setup
Glenn Heshka
A student-produced intro to three-point lighting.
___________________Photographing a Bottle: A lighting Lesson
TheSlantedLens
Three lights and a reflector to enhance a bottle filled with liquid? Yup.
This is a special case, but a common enough product shot/still life problem.
________________________
Lighting various glass surfaces
Phillip McCordallUsing spray and paint to enhance the surface of the glossy reflective surfaces.
Nikon: Speedlight Tutorial: Bounce Technique video
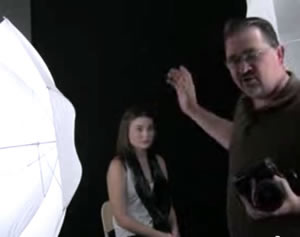
Beginning with a single key light, a lighting setup is expanded with two other lights for best effect. He uses available walls as bounce-light reflectors, uses flags (barn doors) to restrict light, directing light as needed.
Studio Lighting diagrams and tutorial: Joe McNally and the new SB-910 AF Speedlight
This demonstrates multi-light setups for rather complex portrait lighting.
Studio Lighting Techniques: Building edge lighting.
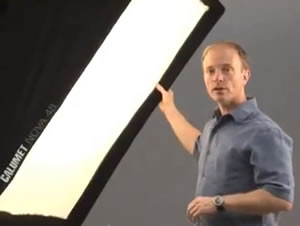
Light Modifiers
A light modifier is anything that alters the character of light.
Modifiers include diffusers, umbrellas, grids, barn doors, gels, gauze and reflectors.They each do something different.
The umbrella is used to spread the light broadly...
the softbox gives a diffuse, soft directional light...
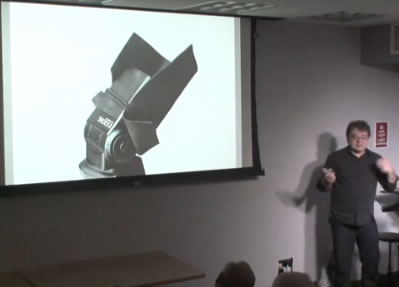
the barn doors flag (block) light from spilling into areas you don’t want illuminated, and...
the snoot channels the light into a narrow, focused beam.
A grid helps to straighten or direct light straight ahead, rather than allowing it to disperse in many directions.
They attach on the ring around the flashbulb. REMEMBER TO NOT TOUCH THE LIGHT BULB! Here is a YouTube video describing the use of these modifiers.
Light modifiers : Live Demo (Umbrella,Softbox,Reflector Panel,Barndoor)
Lincoshop (7.55)This video surveys, discusses and demonstrates a variety of tactics for modifying lighting.
Quite well done and informative.Tabletop Product Photography
createlive (18.01)Even though this guy is a little dorky, this is a good video for shooting products. He uses some made-at-home items as light modifiers.
Basic lighting issues are depicted and demonstrated.
The same presenter has a variety of other videos dealing with table-top shooting tactics and issues.
Umbrella vs. Lightbox
ProPhotoLife (2.27)
Both modifiers soften light.
Umbrellas can be used as reflectors or as diffusers.
Barn Doors and Snoot
interfittv
Barn Doors and Snoots allow you to narrow the spread of a light source; instead of illuminating a broad area, you focus light on a fairly specific, small area.
Colored Lights
Variations on White
Every light source has its own dominant color or hue. In general we want a balanced white light, but white, itself, is actually not well-defined. Whites are measured in terms of degrees tungsten — not a common measure for those of use who use either degrees fahrenheit or celsius, and can't see how temperature and color are related.
Chromatic Colors and Gels
Colored lights can render dramatic visual effects. Light sources themselves can produce colored light, but, more often, gels are used to filter white light into colored light. Gels vary in hue, chroma and in density.
A common film and portrait tactic is to use two side lights of roughly complementary hues — a warm on one side and cool light on the other.
Hard vs. Diffuse Light
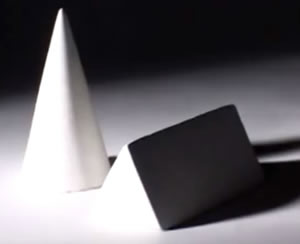
The visual qualities of photographed forms vary according to the directions from which light strikes the subject. Light sources vary according to how direct or how diffuse the light is — does illumination emanate from a very small area, or does it shine on the scene from many directions.
Point light sources or a single flash can produce harsh shadows and abrupt shapes.
Light sources with large reflectors spread highlights and shadows and so produce more rounded, modeled forms.
Lights projecting through diffusers dilute and spread light such that harsh highlights disipate and forms become still more modeled, gradually toned or rounded.
Lights reflected off of reflectors, umbrellas or backdrops can provide soft major light sources or fill lights.
Ambient light, reflected and diffused through the air or via entirely indirect light sources offers the softest and, usually, the least directed shadows and highlights.Diffuse light is, basically, scattered light. Instead of one harsh, direct, point source of light, the source is effectively spread over a broad area. Diffusion typically involves indirect light reflected from a grainy or even matt surface, or a direct light source can be shined through a screen or fabric that scatters light.
Backlighting
Both direct and indirect lights may be used behind the subject.
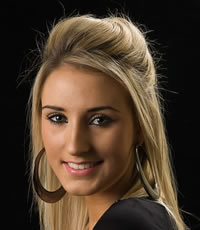
Rim-shots
This photo by David James Williams (www.davidjameswilliams.com) is part of a very useful tutorial on rim lighting techniques.
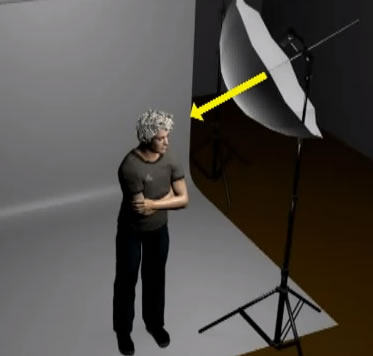
The tutorial includes several lighting diagrams to explain variations on rim lighting setups.Note the illumination on the upper right of the model's hair — the light is coming from behind and above, to create an almost halo-like contour that contrasts beautifully with the dark background.
Rim-Lighting is a common tactic in portrait photography. To achieve this edge-lighting effect, photographers can position a light behind their subject aimed at the back of their head thus producing a glowing edge along the contour of the subject.. The light can be positioned to either side of the subject or directly behind them. Doing this correctly adds a glowing edge around their silhouette.
Rim lighting can be achieved with natural lighting as well — positioning the sun behind the portrait subject. However, you'll usually need a fill light on the face either via a flash or a reflector.
Here is a fairly useful discussion of Rim Lighting. | Rim Lighting Tutorial |
Example: a great back lit ostrich. really. | 30 Examples from PhotoArgus Rim Lighting Challenge |
31 Rim Lit Portraits from LightStalking |Fill Light
Fill lights are used to soften forms and to provide tonal definition within otherwise dark or black shadow areas.
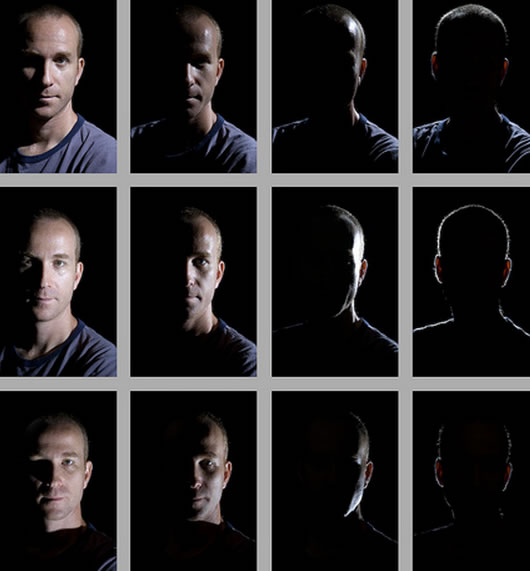
Light Direction or Position
DIYPhotography.net offers a tutorial on portrait lighting and a downloadable "cheat sheet" with an ordered collection of portraits that demonstrate the effects of varied main light positions or directions. N
Note how high light sources vary in effect from low or from level light sources.
Note the effect as the light moves to the side and then behind the subject.
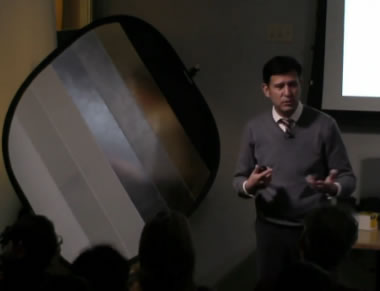
Reflectors
The role of a reflector is to provide directional light without an additional light source. The reflector is positioned so as to reflect light from the sun, or from a studio strobe, back onto the subject. The result is a fill light. The reflectors may be provide rather direct light if the reflector has a mirror-like surface, or the reflector can provide a diffuse light if it has a white or gray matt or grainy surface.
Reflectors can be mounted on tripods or may be hand-held by an assistant.
Because reflectors require no power, they are often used for outdoor portrait and fashion photography.
Many reflectors fold down to a very small size for transport.
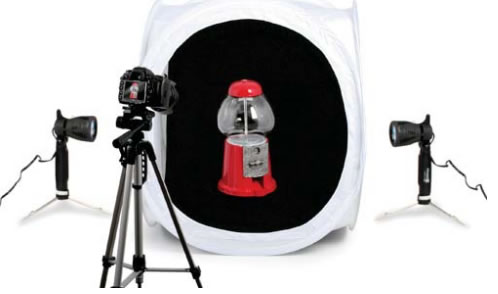
Light Tents and Cubes
Light tents and cubes offer outstanding control over diffuse light and reflections for product shots.
Tips for Using Light Cubes & Tents (PDF)
Download this list of pointers for setting up and using light tents.
How to set up a light tent for product photography: Studio Lighting
This video offers a fairly extensive walkthrough of the very basics of the setup.Product Lighting Using a Light Tent: How do manage reflections on highly reflective subjects. (the video's audio track is a mess... but the last half has helpful info.)
Square Pefect Table Top Cube Lighting (start about 3min in) How to use the color backdrops in the cube.
Model Light
A model light is not typically used as a light source for the actual photograph, so much as providing the photographer with lighting during set up. A model light is projected from the same flash unit as the actual strobe, but can be turned on prior to shooting. This allows the photographer to assess shadows and highlights before actually shooting.