Goals & Concept
Every image has a concept — whether conscious or not, some conception of what that image is to be, guides the choices of subject, lighting, point of view, framing and exposure.
Sucessful portrait photographers work, generally, with the same subject over and over — a human face. So what makes the portraits of one photographer different from those of other photographers?
Concept.
Each photographer conceives their own way of capturing and rendering a face, a person, or a personality. And there are many ways.In this set of images, you will explore the portraits of professional photographers, select several that resonate with you, and then work to capture as much of their concept in your imagery as possible. The challenge is not to duplicate their images with your own sitter, but rather to capture the spirit and graphic character of their image through your own imagery.
The Short Version
You will shoot three sets of portraits.
Each set will be based on the characteristics of a different "source portrait".
At least one set will be in color, and one set will be in black and white. (take your pick for the 3rd set)
For each of the three sets:
Working Shots: Shoot at least 15+ images attempting to capture lighting, pose & composition.
Edited Images:Post-Process at least 3+ of your working shots. Use any and all editing techniques to better capture the traits of your source portrait.
Showcase Image:Select one of your edited images as your best example of your emulated portait.
Upload to Google+ Art265_Photography
Include at least 5 of your unedited working shots.
Upload your Edited and Final Image.
Add descriptive comments to your Final Image explaining your goals. Include a link to your source portrait.
Select your Source Portrait
There are many creative ways to shoot portraits. For this project, you're not so much inventing a way of shooting portraits, as trying to figure out how someone else shot a powerful portrait.
Start by finding your role models — whose portraits do you want to emulate?
Be sure to pick one color image, one black & white image, and one of your choosing.Take a look at Jeremy Cowart's portrait portfolio. | Featured | Men | Women | Groups | World
You're welcome to find portraits by other photographers to work from — just make sure the image is distinctive and evocative.
When you find images that you want to work from, be sure to copy a link to the actual image.
Working Images
Shoot at least 15+ images for each set of portraits.
In practice, this is very few. Its always best to shoot more so that when you move on to post-processing, you've got plenty of options to pick from.You'll select lighting, exposures, backdrops, point of view, cropping, composition and sitter poses in order to create images that reflect your source images.
Your images do not have to use lighting, poses or composition that are identical to that of your source portrait.
You do, however, need to think about the traits that enable your source image to look and feel as it does — what are the traits that are involved?
Pay close attention to lighting and exposure — work to think through these and emulate these closely
Know what you are aiming for.
You'll be expected to describe these traits in the comments for your uploaded final images.
Edited Images
Complete post-processing on at least 3+ images from each set of portraits.
The goal here is to recognize which aspects of the image involve image editing, versus those aspects that have to be planned and executed when shooting the image.
Color, contrast, general exposure refinements can be altered. Masks might localize tonal/color changes. Final cropping is often needed. Touchup or cleanup may be needed.
Make notes on the steps you take — keep a record of the edits and include those notes in the comments for your uploaded images.
Showcase Image
Thoroughly refine and, if needed, retouch at least 1 image from each set to be your most successful example of emulating your source portrait.
It may be that your three Edited Images are great, and you just have to choose one of them. It may be that more refinements are needed. In any case, chose carefully.
Upload to Google+ and Document your Showcase Images
Create an album for "Portrait Emulation1", "Portait Emulation2" and "Portrait Emulation3" -- that is, create an album for each set of photos.
In each album:
— Upload at least 5 of your unedited Working Shots.
— Upload your 3+ Edited Images
— Upload your Showcase Image (which is, of course, one of your Edited Images)Document your Goals and Methods:
— Add comments to (at least) your Showcase Image.
— Include a link to your Source Portrait.
— Describe the traits that make your Source Portrait distinctive — what qualities or features make it unique?
— Describe your preparation and setup for shooting your images.
— Describe your post-processing — what were the key adjustments you made once you got into Camera Raw and Photoshop?
— Describe the traits that you most successfully emulated. In what ways is your image very much like your source Portrait?
— Describe the traits that were not fully successfully emulated. In what ways is your image really not like your source portrait?
— Describe what might be needed to create a more successful emulation of your source portrait? If you had the equipment, the setting and the skill, what might be needed to more closely duplicate the qualities of your source portrait?
Copy the URL of your Source Portrait into your comments.
You'll need to open the specific image you've chosen, then...
(Win) Right-Click and select "Copy Link Address" from the pop-up menu.
or
(Mac) Control-Click on the image then select "Copy Image URL" from the pop-up menu.Paste that link into the comments of your Google+ image.
The link will look something like this: http://jeremycowart.com/new-blog/wp-content/uploads/2013/08/29_Shirock_78141.jpg
Resources
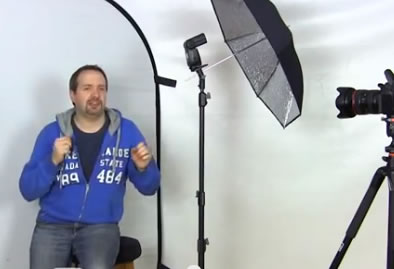
Studio Lighting issues and strategies. Most of this site's lighting discussion and links are here.
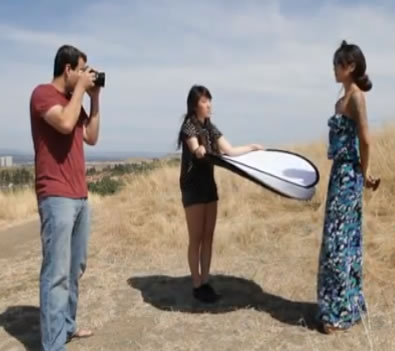
Adorama tutorial on Indoor Portrait Lighting tactics using natural light, a single flash, and/or a reflector.
Adorama tutorial on Taming Hard Sunlight for Flattering Outdoor Location Portraits.
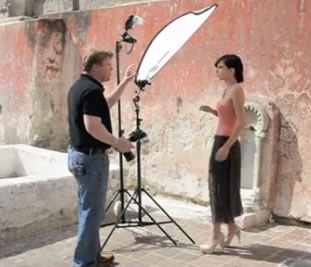
Joe McNally
Shows the use of diffuser panels, reflector panel, fill flash, and direct sunlight.
(part 2) Softening, Diffusing and Managing Hard Light
Joe McNallyShows the use of a light blocker and hand-held pole flash.
Outdoor Portrait Lighting with Fill-Flash
Tony Northrup
Outdoor Portrait Lighting with natural sunlight and reflectors
SLRloungeVery different self-portraits via changing backgrounds.
Gavin Hoey(this video focuses on post-processing far more than lighting.)
In Photoshop he extracts the portrait from the background using complex selections and refine edge tools.
The tutorial offers a fairly extensive post-processing workflow for altering and refining portraits.