Image Organization
Photographers generate a lot of images. Most images have several versions, drafts, files and file formats involved. A single photo shoot may generate hundreds or even thousands of images. Over year's time, a professional photographer may generate tens of thousands of images. Being able to find the image you want becomes an issue.
Eventually you'll need some systematic organization of your images so that you can spend more time shooting and editing than hunting for particular images.
There are a variety of organizational strategies, but most involve one or more of these:
Keywords
Rankings
Folders/Directories
Collections
BackupsBridge | Star-Ratings | Collections | Folders | Storage | Backups | Resources
Adobe Bridge
You'll likely be using Adobe Bridge for your sorting and image management since that is what is installed in our labs. Lightroom and Aperture will offer similar features.
Rearrange the WorkspaceBefore sorting, I want to layout the panels in Bridge so I can easily see what I need to be able to see. I drag the Bridge panels dividers left-right, and up-down so that the preview image is really big, and I can see only a couple of columns of thumbnails. Bridge gives you a lot of control over the layout of your workspace.
Organizing Strategies
There are several strategies that photographers use to visually sort their images.
Star-Rating Sorting Method
Some photographers prefer "star ratings."
Bridge and Lightroom allow you to give each image a star-rating.
Images begin with no stars.
One "star rating" tactic is for you to begin by assigning every image from the shoot a 1-star rating.
Next you'll survey all of the images in the album and begin giving them higher or lower ratings individually. Look, particularly for useless images — images that you know you wlll never use. Give them a zero-star rating. (you can also delete them now, or later)
Then look for strong images — give images a 2, 3 or 4 star rating based on how much promise the have in relation to your project's goals. For now, don't give anything a 5 star rating -- save that for edited, ready-for-portfolio images.
Any images that can't be used for the current project, but might be used for other purposes, you might leave with a 1-star rating.
Bridge and Lightroom allow you to filter the images that display. You can show only, say, images with two or more stars, thus hiding weaker or unneeded images.When you've identified the images you will NOT use, convert them to low-res (<2Mpix) JPG images, and delete the larger original files. You might move them to a “rejects” subfolder in your project folder. (see how to use Bridge to quickly convert a lot of images.)
Collections Method
For project-related work, you might use Bridge's Collections as a way to isolate the images you'll actually use.
Create a new Collection and name it distinctly, usually with the project name.
Then open up your main folder of images.
Then drag images from the folder, to your collection. (this does NOT removed the image from your folder, but places a link to that image in your collection.)
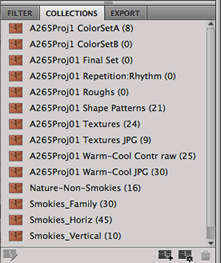
How to create a “collection” in Bridge?
There’s a panel usually in the lower left corner of Bridge with tabs for Filters | Collections | Export.
With Collections panel showing, there’s an icon at the bottom of the panel that looks like a folder with a small “+” on its corner.
Clicking that icon adds a collection.
Be sure and name the collection just after you create it.
Folders and Sub-Folders
All computers offer directories or folders to organize files. Each folder can contain a collection of related files and can contain other folders, thus creating a hierarchy or related files. Whether you're working in Bridge, in Lightroom, in the Mac Finder or in Windows file Explorer, you can add and move folders.
When organizing images primarily via folders, you'll keep all of the images related to a single project in one folder. Inside that folder you can add more folders to store other sub-categories of files — rejects, drafts, final set originals, final set JPGs. Name your subfolders to describe their contents. I put a "_" underscore character at the beginning of the name of the folder so that the folders usually display first in a directory listing.
Consider folders whose filenames begin with the date that the images were shot. To keep folders sorting correctly on any computer system, consider a year, month, date sequence — YYMMDD. For instance, 120704 for the 4th of July, 2012.
Create subfolders for individual projects based on those images.
How do you add folders within Bridge?
While in Bridge, with a folder selected (upper left panel), you can either
Control-Click or Right-Click (if you've got a multi-button mouse)
to produce a popup menu that includes the New Folder command.Also, in the File menu is the New Folder command. (Cmd-Shift-N)
The new folder is added inside the currently selected folder.
Why might a folder-based photo organization system work best?
Because you can take your image collections from one computer to another. Collections and Star-Rating strategies can fail if you move your work to another computer during your project. And, since its likely that you'll be using campus lab computers throughout your project, you need some organizing strategy that doesn't rely on data that remains on the last computer you used.Note that an organized system of folders does not preclude using keywords, ratings or collections. Folders do, however, offer an organizational system that does not rely on support software — you don't have to run Lightroom, Bridge, iPhoto or whatever. If you do have support software, they add access to your images. If your software crashes or you end up working from someone elses computer, you can keep working because you can still find your images.
Storage
Storing a lot of large image files involves big hard drives.... somewhere.
You may be able to use your student M-drive for photo file storage. However, there may be a max storage capacity allowed for student M-drives. (we need to check on what that limit is.)
Cloud storage discussed below, offers convenient web-based storage, but offers limited capacity unless you purchase a subscription for large capacities.
A portable USB external hard drive offers high storage capacity that can be taken from one computer to another. SSD, solid state drives, are becoming more available and are gradually coming down in price. So today drives that will fit in your pocket and run on only the power delivered by the USB cable offer between 64GB and 2 terabyes of storage. At present, you can likely find 1TB portable hard drives for around $100-150.Note: Cloud-based storage offers you offsite storage for photos and other files. There are many web sites/companies that offer cloud storage of data. Some options are free. Most charge a subscription for large amounts of storage. DropBox is a popular option that offers 2GB of free space. The advantage of cloud storage is that you can access your files anywhere you've got access to the web from any computer. The problem, for us, is that many of our files are very large. Our class projects can potentially involve hundreds of megabytes of image files — and typically several gigabytes. The uploading and downloading of those files can be slow.
Backups
Tutorials and Resources
Course Home Page