Goals & Concept
Identity vs. mystery,
obvious vs. obscure,
exposed vs. hidden.That's what you're manipulating here — identity.
Images are not solely dependant on subject matter. The subject — that which is photographed — is an ingredient in a recipe, but hardly the whole dish.
Still more so, an image need not depend on a subject's identity. Which is to say, a strong image does not have to have a recognizeable subject. There are image conceptions that depend on subject identity, and concepts that do not.Edward Weston had an eye for mysterious forms among the most common and familiar subjects. Explore Edward Weston’s “pepper” and his images of shells, vegetables and of figures. Look through his images...how often can you not tell what the subject actually is... at first?
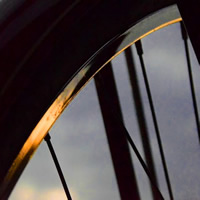
In this project you will shoot a collection of images of one and only one subject — actually, one and only one object.
Your aim is to create two sets of images in which something very familiar and even ordinary, looks both wondrous, intriguing and maybe even beautiful.
In one set, you will shoot images of that object, that do not disclose what that object is — identity is hidden because of cropping or illumination.
In the second set, you will shoot detail images that hide most of the object, and yet the image still discloses what the object is — subject identity is preserved despite the incomplete view.The short version:
You'll create several sets of images of only one subject — and a presentation comp for each set.
The actual sets you'll shoot will be assigned in class.
— In one set, Unfamiliar, you'll create at least 7 distinctly different, but formally unified, images in which your subject cannot be easily identified.
Develop a content concept for the series and express it through the traits of your images.
Keep your subject's identity a mystery.
— The second set, Familiar, is similar to the first, but now each image is to reveal the subject's identity despite showing only a fragment of the object.
— The third set, Full Frame, involves framing the entire object from multiple points of view.
— The fourth stage is Promo. Here you will use your image in several promotional layouts.
— The fifth stage is Cautionary Tale. Here you use your subject to make a statement or to raise awareness.
Your Subject
Pick one particular object to shoot.
Pick a common, ordinary subject that most everyone would recognize and find familiar.
(e.g. a lightpost, a doorknob, a (computer) mouse, a tree, a bicycle, a chair, a building, a doorway, a car)Suggestion: Is it bigger than a breadbox?
Unless you have access to a macro or close-up lens, this shoot may be easier with a largish subject.
Consider, for instance a car or a building or even a person. Each of these are big enough that you can fill a frame with many distinctive detail views without needing a macro to pull you in close.You will shoot at least 100 images of that object — probably more.
Aim for each image to be unique and distinctive compositionally and formally.Concieve each series as a unified whole.
First Series: Unfamiliar
In the first series, aim to hide the identity of your subject.
Your goal is to discover and express the many visually interesting traits and details of your subject, without giving away what your subject actually is; you are to hide or disguise the identity of the subject. Work to keep the viewer from figuring out just what the subject actually is — at least until they have seen several of the images. Avoid any image/composition that clearly “gives away” the identity of the subject. Keep the viewer intrigued and curious. Create visual interest without disclosing subject matter
You might crop in ways that never quite disclose the key, identifying features.
You might light and expose for silhouettes such that you are shooting shapes and profiles of the object, rather than normal "correct" exposures of the object.Develop a conceptual point of view about your subject — consider what you can say about the subject through your images.
(7+ final series images)


Second Series: Familiar
In the images of the second series, make the object's distinctive identity clear and obvious despite showing very little of it.
Aim for a diversity of compositions that disclose as many personalities and distinctive image variations as possible.
Consider what features or traits of your subject most directly reveal what it is. Concieve the framing and composition of your images so as to disclose the identity of your subject through tightly framed detail images.
Develop a conceptual point of view about your subject — consider what you can say about the subject through your images.
(7+ final series images)


Full Frame: Identity vs. Image
Here you allow identity to be bold and obvious, but the character of the object is to be shaped by the photo — that is, the image, branding, attitude or meaning of the object is to be expressed by how the images are framed and illuminated.
Frame your images so that the subject is either entirely within the composition, or virtually all in. (yes... some features may be cropped a bit.)
Explore widely varied points of view. Attempt to capture distinctly different shape or profile traits. Build compelling compostions by giving close attention to negative spaces — particularly the space around your subject, between object and image border.You may add context here -- background elements, setting or set might become more active. The image need not be merely of your subject.
Explore the concept, message or attitude that you would like to evoke through these images.
Create 7 distinct final images.
Create a composite using at least 5 images organized into a coherent and interesting whole.
Promo
Create images of your subject for use in promotional layouts.
Select from:
Cautionary Tale
Create images of your subject in which you convey some message or warning related your subject.
You might warn us about the dangers of obsessive use of this thing. You might point out how wasteful or ecologically damaging this object is — or how its use or manufacture is caustic.
Independent Image
Article Layout
Poster Layout
Expressive Theme
Develop an expressive theme or content concept — decide what you want to say about your subject.
Is it classically beautiful?
Is it tough, durable and rugged?
Is it fragile and vulnerable?
Is it somber and brooding?
Is it happy and cheerful?
Is it bold and confident....or timid and shy?
Is it precious and or ...or is it trivial, cheap and worthless? ...a pearl of great price, or a vanity?
Is it threatening or dangerous?Can any such things be expressed in images of an inanimate object?
Can you express how you see this thing...how you think of it?
Form and Content are best integrated — each informing the other.
If your images are to express such connotations, what forms or traits would you have to develop and emphasize within your images?Explore possibilities by looking at other images.
Explore ideas in your sketchbook. How might you express your point of view?
Suggestions & Tactics
As you set up and compose your images, think about identity — ask, does this framing disclose the subject's identity, or does this composition hide the subject's identity?
How might I reframe, re-light or refocus this image so that the subject is more apparent? ...or less apparent?
What can I do to control, or influence, the clarity of the identity of the subject?See this NikonUSA.com article: Shooting Abstract Photos that Make the Viewer Guess
Vary the point of view.
Look down at it... up at it... straight across at it.
Vary the distance from the subject — vary how it fills the picture frame.
Feel free to alter the orientation — rotate the camera or the final image.Vary the lighting conditions either with artificial lights or by varying the time of day.
Consider varying focus and depth of field tactics.
Suggestion: Concentrate on negative areas.
This shoot focuses, literally, on one and only one object.
You too will be tempted to focus your attention on that object; when you look through the viewfinder you'll most likely be thinking about it.
Don't.
Push yourself to focus on the negative shapes — the spaces around, behind and within your subject. You might even challenge yourself to compose a series of images in which the negative areas are the subject — the real subject.
As you set up your image, are there lighting conditions that might activate the negative spaces? Could backdrops or props be used to provide prominent color or texture or pattern in the negative spaces?
Could you create a series in which the negative shapes of every image are distinctly different?
Sure you can.
Suggestion: Telephoto zoom
Consider relying on the telephoto range of your zoom lens.
From roughly 90mm and beyond, your lens begins to "reach out" and "pull in" your subject. Keep in mind that the longer your lens' focal length, the faster you'll need to shoot — that is, the faster your shutter speed will need to be to avoid motion blur due to camera shake.
The general rule-of-thumb for hand-held shots is that the shutter speed needs to be at least as fast as the focal length is long. What does that mean?
If your zoom is set to ~90mm, then you should shoot at 1/100 of a second or faster. If your lens is at 135mm, then shoot at 1/125 or 1/160. If you have a 400mm lens, shoot at 1/400 or 1/500th or faster.
Note also, that longer focal length settings usually also have a longer minimum focus distance — that is, you'll have to position yourself farther from your subject. Usually the telephoto lens enlarges your subject enough to make up for this distance.
Key Exposure Tactic: Exposure Compensation
We've use exposure bracketing as a tactic to get better exposures while relying on auto-exposure shooting modes.
There is another tactic that every pro uses and uses often — exposure compensation. Estimating ideal exposures can be tricky, but the basics are straightforward.
— For very light-toned subjects: overexpose.
The lighter the dominant tone, the more you overexpose — set ExpComp to a positive value.
— For dark-toned subjects: underexpose.
The darker the dominant tone, the more your underexpose — set ExpComp to a negative value.
— Know how to adjust exposure compensation on your camera while you shoot.
The controls are literally at your fingertips. You can adjust exposure compensation without taking your eye from the viewfinder or your hand from shooting position.
To adjust Exposure Compensation, hold down the +/- button and, at the same time, scroll the main command dial until the desired value is set.
Camera Manual PDFs: D7000 Manual — p. 107 | D90 Manual — p. 90Note that Exposure Compensation only works for A, S, P and M shooting modes.
Prep
— Review the basic operations of a digital SLR.
— Have a memory card prepped.
— Reset defaults on any borrowed camera.
— Image Format: RAWWhat shooting mode will you use?
If I am concerned with depth of field, I'll likely prefer Aperture Priority Mode.
If I want to produce motion blur, or be sure to avoid it, I may prefer Shutter Speed Priority Mode.
You could shoot this set on full auto (P) or manual (M).You might turn on Auto-ISO Sensitivity.
Focussing: Auto or Manual?
If the images you concieve involve a very narrow DOF, you may want direct control over focus and so use Manual focus. This can be easier to manage if you're on a tripod and your subject is very close.
You might also use the Focus Lock technique to tell the camera what forms to auto-focus on. This is easier if you're shooting hand-held rather than on tripod.
Camera Manual PDFs: D7000 Manual — p. 97 | D90 Manual — p. 57
Process
Shoot at least 100 images of your subject.
Work to explore as many distinct compositions as possible — how many different ways can this object be seen?
From what direction might I shoot?
Can I zoom in or out and discover something differently? Can I rotate the camera to create new shapes and balance and dynamism?
Are there any lighting variations that might alter my imagery?You are allowed to crop images in post processing, but your goal is to capture your composition in the camera's viewfinder. This allows your final image to be displayed at maximum resolution or enlarged to a large-format print.
Take time to review the images that you've just shot. See how they look.
Do they do what you intended?
Do they suggest other possibilities?
Do Multi-Shoots
Consider shooting your subject during two or, better, three different shooting sessions.
Shoot the subject once (say 50-100 images), then survey your images in Bridge. Look for the compositions, points of view and lighting that you wish you had shot.
Write journal notes and make sketches for the images that you want to shoot next.
If your exposures are too dark or light, check the over- and under-exposure data in your image meta data, and make a note of the exposure compensation(s) you'd like to try next.
If lighting or shadows are creating the wrong shapes, can you reposition either your subject or the lights?
If shooting by natural light, could you shoot at a different time of day? (How well can you anticipate what shadows and illumination will be at different times of day? ...and year?)
Review your images for sake of the whole series
When in Bridge, feel free to pull some of your rough images into Illustrator to see how they might work as a group. Arrange them in various ways — either in an exhibit-like row, or in a row-column grid, or in some sort of a composed cluster.
Feel free to crop or edit images to explore what the series might become.When you look at your images as a presented series, do the formats (particular proportions... vertical vs. horizontal?) of the images matter?
Should some be shot differently so that they can then be cropped differently?Do they compose as a group?
Do they form a well-unified whole?
Do they interlock into an interesting arrangment, if that is a strategy for the set you're concieving?
Look for "missing images" that might complete the set as a whole. Write journal notes and make sketches on whatever you need to shoot during the next shoot.
Post-Processing
— Transfer your images to your m-drive or personal drive so that you can view them in Adobe Bridge.
— Select images that have visual potential based on the theme you select. Many of your images are likely worthless -- at least at first glance.
Look for images that have something in them — some image within the visual field that might be cropped into an interesting image.— Select and develop the graphic theme and content concept that will guide your selection and editing/cropping of images.
— Edit images with potential into sets of finished images.
You’ll have to settle on the theme that your images will reflect — you might pick one of the themes noted above, but can likely find something that interests you more.
Now start cropping, rotating and editing these images for best effect.
When working in Photoshop, avoid using decorative filters. Do not added elements, or erase elements in any image. Cropping, rotating and limited global color/contrast editing are allowed.
— Upload to Google+ into “004 Unfamiliar” and “004 Familiar” folders. Drag those into your Art 265 circle.
— Describe the traits that unify this set of images. Write a short (25-75 words) concept statement that describes the content that you are aiming to express about, or through your subject. Describe, also, the visual forms or compositional tactics that your sets of images emphasize.
— Review and comment* on the photos uploaded by at least 7 other students before class.
* Provide relevant comments (25+ more words) discussing what you see in the photos presented -- comment particularly on what impresses you or what catches your eye. Comment on what you think might improve the cropping or editing of the presented photos.
Required
By Tuesday, 8am
Shoot at least 100 images.
Select (at least) 20 of those for editing.
Select 7 of those for G+ presentation in two theme-unified series.Downsize images to 2Mpix JPGs before upload.
Post to G+ :
Project Photo Album: 004_Unfamiliar (7+ images with unknown subject, plus presentation composite)
Project Photo Album: 004_Familiar (7+ images with recognizable subject, plus presentation composite)
Write an artists statement for each final series and include them as a G+ captions for the series composite images.
— Discuss the expressive concept. What did you aim to express about your subject?
— Discuss whatever graphic theme or emphases you developed in your compositions. Usually these graphic traits are your means of expressing a point of view towards your subject.
— Discuss the strengths of the final images in relation to that theme.
Tuesday, before Class
Crit your Peers:
Go to G+ and review what your classmates have uploaded.For each classmate, go to their 004_Familiar album, and their 004_Unfamiliar album.
Add comments to at least one image, or to the series as a whole. Discuss one or more of the following topics:
— Discuss the expressive attitude of the images — what point of view has the photographer taken towards the subject? What does he/she say about the subject?
— Discuss ways in which the series is formally unified — what traits tie the separate images together?
— How compositionally successful are the images? What is visually interesting about them?