Creative Space

Art 160 / Greg Clayton

Create a small, efficient space that facilitates creative process.

This is a space-design problem. Your job is to conceive a place that serves functionally and evokes a character consistent with the project's goals.

How "real" or practical is design solution to be?
Your job is to imagine the just-barely-possible, not to redo the predictable — think outside the box.

How far will we take the design...do we have to build it or make detailed plans for it?
You'll not be completing any technical design features. You do not have to be an interior designer or architect — you have to explore the goals and then imagine solutions.
You'll present your concept — you'll only be presenting us with graphics that communicate your distinctive space concept. The aim is to enable us to imagine being in your unique space.

Creative Space


Space1: Group Design

— work with 3-5 people to conceive and design the most radically creative space you can imagine.
Then communicate it to the rest of us!


Space2: Individual Limited Design

— work on your own to design a small, highly efficient creative space.
Then tell us about and show us your unique solution for a space that would motivate and facilitate your creative work.


Goal: 

Explore the particular atmosphere, equipment and space/ergonomic conditions that will facilitate your creative process.
What kind of place do you like to create in?
What sorts of stuff do you want around when you create your work?

Explore efficiencies — your space is small. How can you get the most from the least? What features will you eliminate? How will you provide multiple solutions within a confined design?

Explore a Source Concept or Parti — if there were a metaphor that your space expresses, what might that be?  A cocoon... a space ship... a time machine... a computer?
What source concept would you identify with?

Develop a distinctive graphic concept — select one visual element (line, shape, color, texture, mass) and make that the driving visual dynamic of your design. Explore how that element can provide both character and visual interest in your space.

Graphically emphasize the areas of your space that are most critical to your creative activity — and subdue (relief) areas that are supportive, but less central to your process.


Explore Your Creative Space and Process

      1. Identify the problem boundaries and goals.
      2. Concieve, refine and create a simple design that reflects you.
      3. Observe your own creative process — discern your current creative habits. What kind of atmosphere and resources are needed for you to create what you create? What distracts you from effective creative work?
      4. Explore any existing materials or equipment that might be useful to you.

Present your Initial Concept (Individual Design)

Create an 11x17 (max)  concept presentation. 
Present any notes, ideas, materials, equipment, views, etc. that might introduce us to your distinctive conception of your ideal workspace.  This may be very rough…this quick presentation  is an organized collection of ideas, not a finished design.

Include a concept statement describing what you are aiming for — what are the distinct and unique qualities of your creative space? What does benefits or functions does this space offer? (content/functional concept

Describe the client briefly — what kind of designer works here?  What kind of design work is done here?  (client concept)

What graphic/visual forms will dominate and unify your design (graphic concept).

Presentation/Graphic Communication Issues:

As you arrange your ideas on your board, think about emphasis and relief — make sure there is enough relief space to keep your presentation from feeling cluttered and disorganized.

Think about graphic hierarchy— what visual “information” should be very prominent, and what can be subdued?

Think also about alignment as a strategy for introducing a sense of order.  What edges (of photos, sketches or text blocks) might be aligned?
Consider clusters of informationgroup text and graphic related to a single concept. Add borders (ok) or space (better) around groupings.

Think about the border or bounding space —  leave enough  relief space “outside” the design, to help “frame” the area that has imagery and information.

Suggestions

Brainstorm, List & Inventory what you need:

Functional Space Needs:
List the tasks that you must complete in order to create what you create — what tasks or activities are actually done within this creative space?
What do you actually do while concieving, developing, implementing and communicating your ideas? Describe each task...sketch or write about what goes on.

List the equipment or resources that must be accessible in order for you to do what you do. What work surfaces (desks, drawing boards, computer monitors, pin-up boards) are needed for each task.

List and describe the amount of workspace that must be available in order to complete each task — particularly, how much space is needed? How much room is needed to brainstorm? How much room is needed to build a model? How much room is needed to make a sandwich during breaks?
List and describe all of the spaces you can think of.

Inspirational Space Needs:
Explore whatever inspires you — what gets your own ideas flowing? What gets you curious and eager to explore new solutions? What situations evoke a sense of wonder in you? What helps you feel confident that you can successfully create whatever you can imagine?
Take time to explore creative downers — explore those conditions or events that stifle your creative flow. What really messes with your concentration? The telephone ringing? TV news? Windows? No windows? Messy spaces? Neat spaces?

Sketch lots of ideas...quickly. There is no "right" answer to this. Give yourself lots of options — require yourself to create 20 possibilities in 10 minutes. (really...you can do it.)
Then step back and see which ones seem more "right" than the others. Explore what's missing in each idea. Note the "must have" features in each idea.
Refine, combine, revise as needed — sketch more.
Then clean up several of the best concepts as best possible — take them to the next level of clarity, detail and completeness.

Remember that your idea is more important than your skill...but push your craftsmanship as far as you can. Craftsmanship affects how well your concept will be communicated to others. If you want your client to go along with your concept, make it clear enough for them to understand it.

Creating Imagery for Presentations:

Sketch all you can, but feel free to grab imagery of existing objects/equipment — you can clip images from magazines and the web and catalogs. Use them to present the "pieces" of your concept. Don't draw what you can find images of. On the other hand, don't search for images of what you can draw.

Use a photocopier to duplicate, enlarge or reduce found or created images.  (you can also lighten or darken images.)  Consider including a label or title.  Are notes or explanations needed? (remember all of Rube Goldberg’s notes?) 

Sketch over Isometric or Persective templates to quickly rough in 3D sketches of your concept.
Use a light table, and trace over these templates. These are PDF files -- most print on tabloid (11"x17") sheets. Each template offers a slightly different view of your space.

Isometric — 30°x30°
A moderately "bird's eye", centered view.
Isometric — 20°x20° Isometric — 10°x10°
A fairly low angled, centered view.
3 pt. perpective grid from above. (another) 3pt Perspective Grid.  
Note also that Adobe Illustrator CS5 (in the Mac Lab) has a perspective grid tool that allows you to draw features in 2D (flat features, say, against a wall) and then "attach" them to a 3D pespective grid. (you might be able to scan sketches and then attach them too...Illustrator definitely offers some distortion tools that can do that manually)

video tutorial on perspective tool | 2 | 3

video tutorial | Spanish tutorial | another quick one


Sketch — Exploration & Communication

Recall the 4 roles of sketching discussed in class: ideation/generation, refining/analyzing concepts, seeing/percieving, and communicating.
You may not do any "seeing" sketches for this project, but each of the other three tasks will be used.

Explore sketching as a tool for analysis of necessary features/traits (list, describe or show features that need to be included, or features  that have been included in other related designs, or features  the might  be included.)

Explore sketching as tool for ideating.  Record every wild idea that comes.   Make notes as needed – ideas  may be  recorded in words or in images. 

Explore sketching as a tool for getting deeper into the solution – sketch other views or close up details…use your sketches to make your ideas concrete and specific so that any problems become more  obvious before you finalize your  design.

Explore sketching as a tool for communicating your concept to others.  What are the essential views or  features that must  be  presented in order for others to comprehend how your design/idea is  unique?

Creative Spaces

Explore what other designers and creative folks have done.
Most businesses thrive on creative ideas — some businesses work hard to provide environments that nurture a conceptually open-ended yet focused, creative process.
Below are some photos and articles dealing with creative work spaces. Be sure to send me links to any sites/sources that have good ideas or examples.

Pixar Video Tour (Part1: Love Lounge ***)


CNN tour of Pixar Animation Studio**

12 Creative Professional Offices **
InventionLand*** (video 5.30) | alt (video 6m)
Ogilvy & Mather/Guanghzou | images**

Pixar Studios Part2 Voice Recording Studio

Pixar Part3 Production Process

Pintarest Creative...
Workspaces
Desks
Art Studios

12 of the Coolest Offices in the World***

12 Stimulating Offices *

Creative Workplaces*

The Perfect Workspace **
The Caveman's Guide *
Collaborative Office Design **
Three articles on essential features
...round tables, color, light, plants, views, nature...

Creative Office Design

Images of Creative Workspaces

25 Creative Workspaces

Inspiring Workplaces photo pool (Flickr)

Creative Office Ideas: extremely fun and "out-of-the-box" approaches to the usual office supplies. If one really doesn't have enough room for a large creative working space, there's always the option of turning the boring stapler and pencil holder into an exciting new form. My favorite on the list was the DIY Wall Clock.

10 seeeeeriously cool workplaces ***
"The physical workspace is one of the most ignored, yet most important factors in creating good workplaces."

Link Between Creativity And Office Design (article)

On Great Architectural Design...

Why the Buildings of the Future will be shaped by YOU... (expressive architecture) TEDtalk 18m

Buildings that Blend City and Nature TEDtalk 12m

Why Great Architecture Should Tall a Story/Ole Scheeren/TEDTalk 16m

Design Tips for Creative Workspaces ***
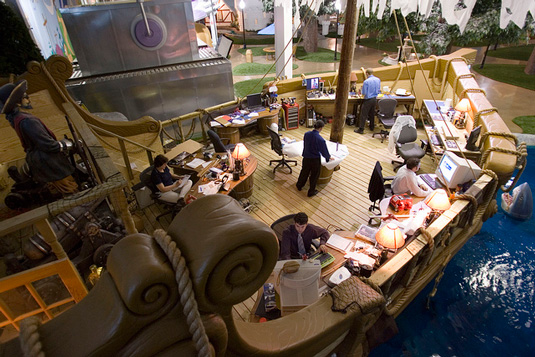
"have pilates balls instead of chairs"

10 Office Design Tips to Foster Creativity

Studios/Workspaces of Accomplished Artists & Writers *

A Rare Look Inside Pixar (NYTimes)

More Pixar...

A Day in the Life of John Lasseter (Pixar) 25m

The Pixar Theory - narrative construction (a reading; 16.02)

Pixar/Toy Story 3 Production

Pixar Office (images)

Google London Offices**

Office Design Gallery

Red Bull offices

MindLab (Flickr) An egg to create in.

Send me links to images of, or info on places that inspire the best!

Glossary | |


Greg Clayton
Design Foundations I
Design Foundations II

Senior Seminar

 
Photography Course
 
Course Schedule
Course Schedule
 
Independent Study
 
               © 2017 Greg Clayton/ gclayton@harding.edu