We have several pieces of lighting equipment available for use in Art 265 course work.
Lighting Kit1 — Square Perfect 3 Light Set with Diffuser Boxes
Lighting Kit2 — Photogenic 2 Light Set with Umbrella Reflectors
Lighting Kit1 — Square Perfect 3 Light Set with Diffuser Boxes
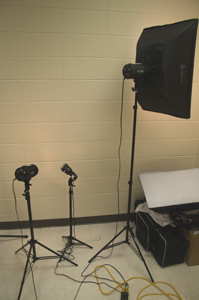
Our studio lighting kit comes with the basics needed to explore 3-light studio setups.
The kit includes:
2 strobes with diffuser boxes
(in the photo, left, one diffuser box is mounted on one of the strobes. The other strobe, on the left, has no modifiers mounted.)1 back light
(smaller light in the middle)
_________________________These lights are automatically synced, which means that if one fires, they all fire simultaneously. (assuming they are all powered and turned on)
Thus, to use these, you have to sync your camera with one of them.Radio-Sync Unit:
To sync your camera to the the lights, use the hot-shoe transmitter. Once synched, when you take a photo, all of the lights will fire simultaneously with your shutter.There is a transmitter (on the right) and a receiver (in the middle.)
This should be kept stored in the nearby lighting cabinet.
Plug the receiver into one of the strobe lights.
Turn everything on, and begin adjusting intensities, light positions, light directions, light modifiers, and your exposures.NOTE: this unit can be used to drive either lighting kit.
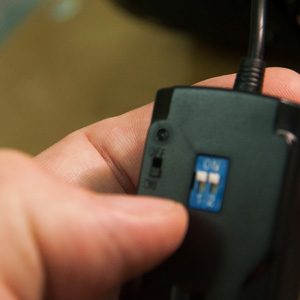
NOTE: alternatively, you can use the cable-mount to drive flash units.Both the transmitter and receiver have radio-frequency settings.
Here both "1" and "2" are turned "on".
As long as both units are set the same, they will communicate (and your camera will, thus, synch with the lights.)The back of the receiver has a very small switch in the upper left.
Turn this ON for your shooting session.
Turn it OFF when you finish your session.
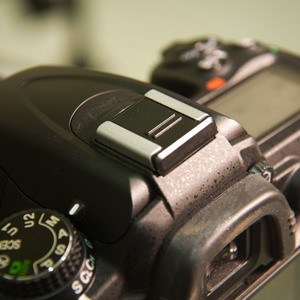
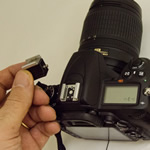
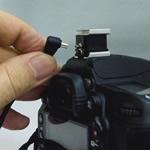
Hot Shoe Mount
Your camera's hotshoe may have a hotshoe protector in place — this is intended to minimize damage to the electrical contacts and to the physical mount itself.
Just slide the protector out and store it in a pocket of your camera bag.
When you're done shooting, replace it.The transmitter will slide into the hotshoe mount.
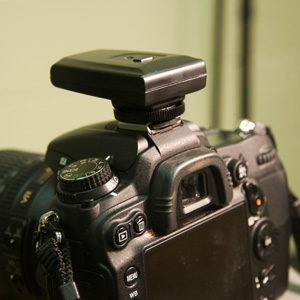
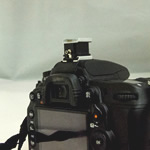
You may need to rotate the mount's knurled wheel to loosen the mount.Here is the transmitter mounted.
Be sure to tighten the knurled wheel to securely mount the transmitter to your camera.
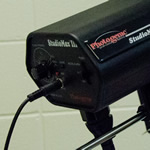
Connect Receiver to Flash Unit
The receiver has a 1/8" jack... like a headphone jack... that fits into the Sync port on the strobe light.
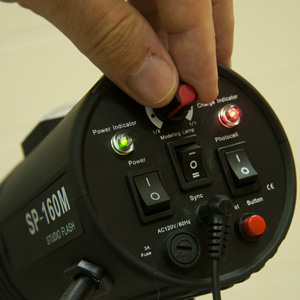
Plug this in.Turn on the main power for the strobe unit.
(left-most button... green light turns ON)
Turn on the strobe. (right-most button... red light turns ON)If you want the modeling light on, flip the middle switch.
The knob at the top allows you to adjust the intensity of the strobe light between rather dim and very bright.
You'll likely adjust this repeatedly as you set up your lighting arrangement and shoot your initial exposure-test shots.Note that after firing the strobe, the unit will have to recharge.
The red light will turn off until it is fully charged.
The unit will sound a "beep" when it is fully charged.
Until the unit is fully charged, it will not fire at full intensity.Backlight Flash Unit
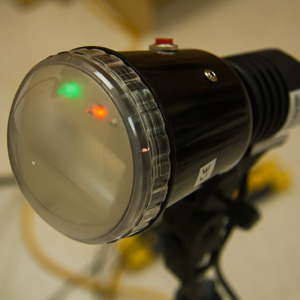
The smaller backlight unit is simpler than the main strobes.
It is either ON or OFF... it does NOT have variable intensity settings.When the power is ON, the green light is on.
When the strobe is fully charged, the red light is on.
Lighting Kit2 — Photogenic 2 Light Set with Reflector Umbrellas
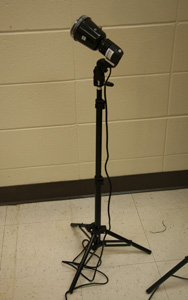
The Photogenic kit has more power than Kit1 and has a more rugged set of poles/tripods.
However, there are only two lights, and there are no diffuser's (at present).You'll usually use the kit's umbrella reflectors to direct and spread your light.
Thus, you'll aim the lights away from your photo's subject, and aim the umbrellas at your subject.Otherwise, most features are roughly the same as in Lighting Kit1
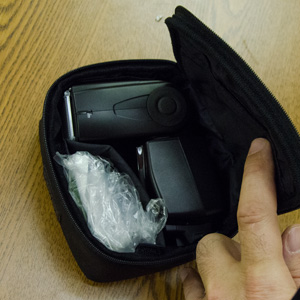
If the kit is in its carrying case, you'll need to set up the tripod/light poles.
Notice how everything is securely arranged and packed in the carrying case — as you'll eventually need to put all back as you found it.
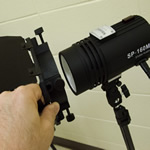
Mount the flash units on top and securely tighten them to the fitting.
The units travel with a large, black plastic dome protecting the (very expensive and delicate) flash bulb.
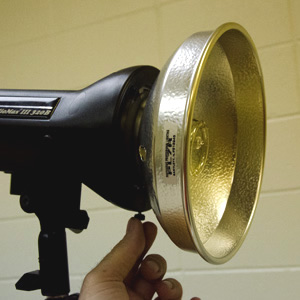
Remove the protective dome carefully by unscrewing the set screw from the bottom. Then pull the dome forward... it comes loose at the bottom and then tilts upward. Be careful not to hit the looping bulb underneath, and also, be careful to not touch the bulb with your fingers. The oil from your fingers can damage the bulb when it heats up.Attach the metal reflector to the flash unit.
It fits roughly the same way that the protective dome did.
... carefully slide into the tabs along the top lip of the mount...
... slide the bottom in....
... rotate the reflector so that the hole is downward...in the 6 o'clock position (so that your umbrella's pole can later slide through)...
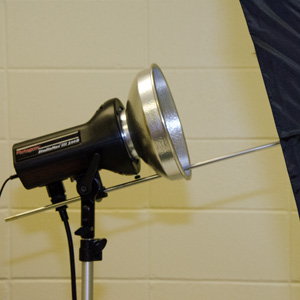
...and tighten the set screw to hold it securely.The umbrella reflectors mount to the flash units through the hole in metal reflector, into a hole below the flash unit.
Slide the umbrella pole through and tighten the set screw securely.
When set up, the reflector and flash unit look like this... There are several ways to "drive" the flash — to sync it with your camera.
1) You can use the radio transmitter discussed with Lighting Kit1. It will work for this lighting unit in the same way.
2) You can use the hot show mount with flash-cable fitting to connect your camera to one master flash unit by a cable.
3) You can use your Speedlight as a master to trigger the slave flash units.
This is an alternative to the radio-sync unit discussed above.
These components allow you to connect your camera to one of the flash units via a cable. The camera thus "fires" that flash, and that flash will fire the other flash units.As illustrated on the left...
...mount the Cable Mount on your camera's hot shoe...
...connect the cable to both the Cable Mount......and to your main flash unit.
Now, once powered on and settings set, your camera will drive the flash units.
Small lights for light cubes.
We have several small lights usually used to illuminate the light cubes.
They have simple tripod feet and stand about 14" tall.These are very simple lights — they are either on or off.
They cannot be adjusted brighter or dimmer.
You can use gels to darken or to color the light source.
If you want less illumination, either use a modifier, or move the light farther away.
If you want more light, either move the light closer, or use more lights.
They stay on continuously, and can get hot.You can mount them on boxes or on other light poles to get greater height.
Be careful as they like to fall over.
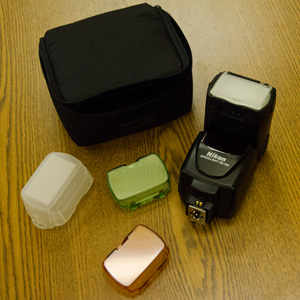
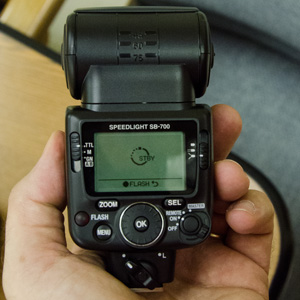
Speedlight Flash
The SB-700 Speedlight Flash works well with our Nikons. It can be used on its own — as the sole flash mounted to the camera, or it can be used off-mounted (positioned on a stand or on a light pole, rather than on the camera). The SB-700 can also be used in combination with other studio lights, actually acting as a master to strobes set as slave units.
Note how the flash unit and diffusers fit into their case. You'll need to repack them when you're done.
The main SB-700 controls include...
Flash Mode: (upper left)
TTL Mode — through the lens metering. Causes your camera's light meter to communicate with the flash so as to attempt automatic exposure control.
Manual Mode (M) — gives you direct control of the amount of illumination delivered by the flash. You'll use the scroll wheel to set power level.
GN —
A:B —Scroll Wheel: (bottom middle)
In TTL Mode, adjusts exposure compensation, thus increasing or decreasing illumination.
In Manual Mode, adjusts level of flash power or intensity.On/Off/Remote/Master:
Mount Lock (very bottom)
L position securely locks flash to hot shoe.Tutorial video that discusses adjusting the automatic exposures using TTL Mode (Through The Lens metering mode) and the over- under-illumination by adjusting the exposure values (ev).
Also discusses basic Manual Mode setup and adjustments. Note how the power (intensity ) of the flash is adjusted.
Discusses variations in flash angle and then demonstrates use of varied bounce flash angles in portrait shots. Production quality is low and a bit slow, but helpful basic-use info is demonstrated fairly well.Here is a nice intro video to features on the SB-700... Check it out.
He demonstrates most of the controls and features...(but frankly doesn't explain what each is doing.)
Remember that "TTL" means Through The Lens metering. When the TTL mode is used, the camera and flash are communicating with each other. The camera's light meter will, in effect, tell the flash unit how intense illumination needs to be, automatically increasing or decreasing flash power as needed.This video intro really doesn't tell you how to use it, but it shows you what each part is for... and the music isn't bad. (how exciting can a flash tutorial be...really?)
This Mike Browne video discusses basic use of a flash unit (or, as he calls it, a "flash gun")
Accessories
Extension Cords
You'll need to use the breaker-protected extension cords to power your various flash units.
Please be attentive to accumulating cables... watch your step. Tripping over a power cord can take down several lights at once. Not good.Light modifiers
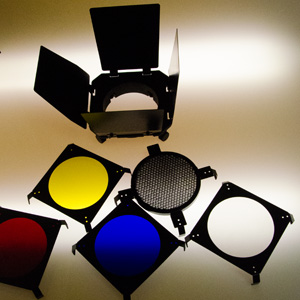
There are a varity of modifiers that can be used on the strobes — colored gels, barn doors and diffusers.These will be stored (and returned to) the lighting storage cabinets.
Reflectors: usually fold up into the round black fabric packets.
The Square Perfect (Lighting Kit1) strobes have several modifiers available.
On the left is the "barn door" fitting (top)...
...four colored gel filters that can be attached to the barn door fitting (bottom)...
...and a directional grid (center). This "straightens" the light so that there is a more focused beam with less spread.
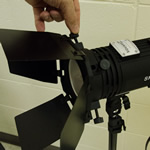
The barn door fitting slips around the housing of the flash unit.
You'll need to loosen the four set screws.When positioned, tighten the screws until the barn door is secure.
The doors themselves can be opened or closed individually to any angle in order to limit the spread of light.
(the last photo)
Color gels or the grid can be snapped onto the barn door fitting.
Note that the grid can also fit on top of gels.With a combination of gels, barn doors and the unit's intensity level, you've got a lot of control over the quality and impact of illumination.