Tactics
There are many ways to create refined, or rough, isometrics. A few are noted below.
Freehand Isometric
Draw your space and/or objects while keeping the horizontal edges at consistent angles.Perspective Grid Tracings: buy, download (below) or generate your own isometric grid.
Trace you floorplan onto the grid. Then project heights from isometric floorplan. (recall the vertical measurements may be the same as measurements along grid axes, but often look better when reduced.)
Isometric — 30°x30°
A moderately "bird's eye", centered view.Isometric — 20°x20° Isometric — 10°x10°
A fairly low angled, centered view.3 pt. perpective grid from above. (another) 3pt Perspective Grid. A selection of perspective grids
and notes/suggestions) by interior designer Peter Klick
(download the "original" size of each image via "Actions: View all sizes: Original" )
Isometric Constructions (using T-square/triangles/drafing board or using CAD drawing tools.)
3D Modeling Applications (Google Sketchup, AutoCad, Revit, etc.)
Adobe Illustrator:
1) Get your floorplan into Illustrator.
(note: it is handy to include a scale (ruler) in the floorplan ... that way your scale is scaled along with the floorplan.)
Options:
— You can scan a sketched/drawn floorplan, scan it, and then import it into Illustrator, or
— you can draw you floorplan in AutoCad/Revit and export to a format that Illustrator can open/import (ai, eps, pict, jpg, etc.), or
— you can draw the floorplan directly in Illustrator.
This quick, rough plan was drawn directly in Illustrator, but it could just as easily have been sketched on paper, and then scanned.
Notice that a scale is in the sketch.
(the plan is of a sparse little restaurant with 6 tables, a fountain feature in the center of the dining room, a curving bar near the top.
The foyer has bench seats along the walls, two double entry doors and a consierge desk in the center.)(for the following steps, be sure the entire floorplan and scale are selected)
2) Scale the floorplan to fit your page (if needed).
You can scale it later, as well.
3) Scale the floorplan vertically.
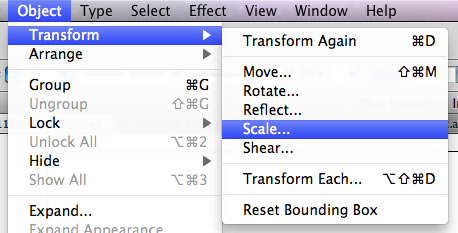
To open the Scale dialog box:
— double-click on the scale tool OR
— access the Object: Transform: Scale... menu (below)
Note that we're using the "Non-Uniform" scale ... we don't want to scale the plan horizontally ... we just want to make it "shorter".
I'm scaling my floor plan to 60% of its original height. This amount is a bit arbitrary, but it works fine.
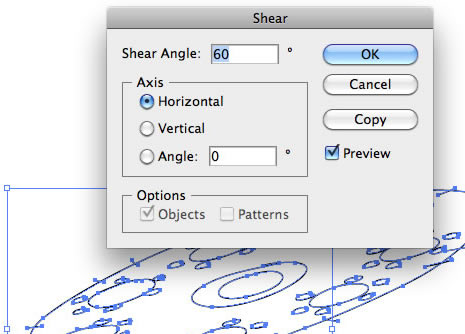
4) Shear the Plan
To access the Shear dialog box, either ...
— double-click the Shear tool (press/hold the Scale tool to see it)
OR
— access the Object: Transform: Shear... menu (left)
I've set the Shear Angle at 60 degree along a horizontal axis. This angle is also a bit arbitrary, but works well.
5) Rotate the plan.
Rotate the long-axis of the plan to a roughly horizontal angle.
You can rotate the plan manually (drag near the corner handles)
OR
You can access the Rotate dialog box by...
— double-clicking on the Rotate tool
OR
— access the Object: Transform: Rotate... menu (left)
I've set the rotation Angle to -16 degrees
... which seems to be about right.6) Project Floorplan upwards.
You can use Illustrator tools to draw vertical lines from points on the plan, or you can print the plan out, then take the transformed floor plan to your drafting table and draw vertical lines up. If you do this, be sure to print the scale -- you can use it to measure vertical distances. (though I often scale the scale to 60% or 80% ... you can do this via Illustrator, or you can scale it easily on a photocopier.)
My sketch was created in Illustrator, so each object/shape is a separate object.
So I can (shift-)select multiple objects that are all the same height, then...
... Option-Shift-Drag them down to their height in the isometric. For a quick Isometric I'll just do this by eye, but I could also measure the proper heights for a more detailed rendering.Adobe Photoshop:
Photoshop offers roughly the same options outlined above.
Select your graphic, then use these commands to perform the same operations as above:
Edit: Transform: Scale...
Edit: Transform: Skew... (Photoshop's Skew command is the same as Illustrator's Shear tool.)
Edit: Transform: Rotate...Then you can print your isometric floor plan, and "extend" objects upwards (or downwards) to create your Isometric Perspective.
Online Tutorials
There are a lot of online tutorials for various perspective techiques. As with all things on the web, you have to sort a lot of chaff to find a bit of rich wheat. Do Google searches on "isometric" "orthographic" "perspective" etc.
The latest versions of Adobe Illustrator has some outstanding tools for converting flat-plane imagery to both isometric perspectives and to linear perspectives.
Title/Link When using Adobe Illustrator (older (pre-CS5) or newer versions).
Helpful if you generally understand floorplans & elevations.This is a fairly good introduction to the concept of isometrics — he goes over the basic views. He shows how to get Adobe Illustrator to "snap" to the angles (axes) needed to draw isometric lines.
He steps you through the process of making your own isometric grid. (usually, you'll just download an existing grid, or use some online resources to generate a grid, but sometimes you need to make your own.)
How to Create Advanced Isometric Illustrations Using the SSR Method
(This is a followup, and alternate method to that described above.)
When using older or current versions of Adobe Illustrator.
Same basic tactics will work in most CAD programs — as long as they have a skew/shear tool.
This method is quite handy if you have your floor plan (or top view) in a CAD system or even sketched & scanned.
It is " much more useful for creating curvy or complex isometric objects in Adobe Illustrator. I’m going to call this method scale, shear, rotate or SSR ....by using tools in Adobe Illustrator you can place an object onto an isometric plane without using a grid.
After altering the plan/top view into the isometric plane, you then project point up (or down) to complete the 3D viiew.
Create a Shimmering Cityscape in Perspective, Using Illustrator CS5
Adobe Illustrator CS5+ (using the Perspective Tools)
"The Perspective tools in Illustrator CS5 make it a lot easier to draw in perfect one, two or three-point perspective. Using symbols in conjunction with the Perspective tools will make quick work of this stylized cityscape."
If you have access to Illustrator and are generally comfortable with its tools, try this one.
Create an Axonometric Image Without Guides or Grids
Any version of Adobe Illustrator. This is similar to the "SSR" method above. Instructions are well-illustrated. The example is a (sort of) product design, but the same steps will get your floorplan turned into an isometric, and ready to be "stretched" up into 3 dimensions. Create a Classic American Diner with Perspective Drawing Tools
Adobe Illustrator CS5+ A nice intro to using Illustrator's perspective tool to create an exterior view of a building. Illustrator Perspective Tool Video
and
Perspective Grid InstructionsAdobe Illustrator CS5+ Draw directly in (linear) perspective.
Maybe this is too easy.Search on Vector.Tutsplus varied applications, but mainly Adobe Illustrator Tutorials Many tutorials on isometric and perspective rendering tactics.