- A form in Windows Forms programming is a window that contains widgets/controls
- A widget or control is a software component that a user manipulates to interact with an application
- Form1 represents the application's main window
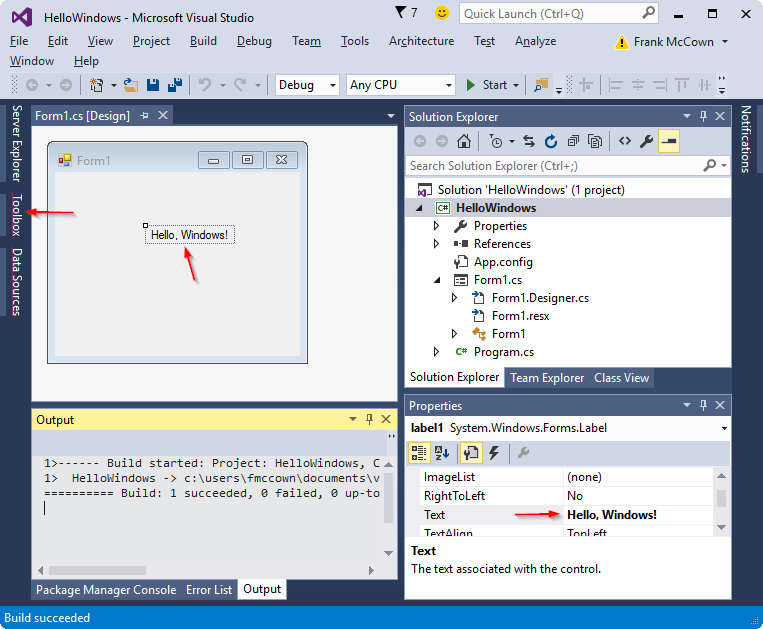
- Select Toolbox from the left side of the screen and drop a Label onto Form1
- Change the Text property of the label to Hello, Windows! as shown in
the image below:

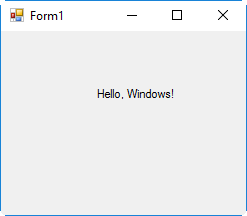
- Ctrl-F5 to run the application

- Examine the code by double-clicking on the desired file in the
Solution Explorer
- Program.cs
using System; using System.Collections.Generic; using System.Linq; using System.Windows.Forms; namespace HelloWindows { static class Program { ////// The main entry point for the application. /// [STAThread] static void Main() { Application.EnableVisualStyles(); Application.SetCompatibleTextRenderingDefault(false); Application.Run(new Form1()); } } }- This file is rarely edited
- The
usingdirective is likeimportin Java: it allows the programmer to use a type in the namespace without having to preface the type with the namespace. Example:System.Windows.Forms.Applicationvs.Application Main()is always the first method executedApplicationprovides static methods and properties to manage an application, such as methods to start and stop an application, to process Windows messages, and properties to get information about an applicationApplication.Run()begins running a standard application message loop and makes the givenFormvisible;Run()will not return untilForm1is closed
- Form1.cs
using System; using System.Collections.Generic; using System.ComponentModel; using System.Data; using System.Drawing; using System.Linq; using System.Text; using System.Windows.Forms; namespace HelloWindows { public partial class Form1 : Form { public Form1() { InitializeComponent(); } } }- To view the code instead of the form designer, right-click the form and select View Code from the context menu
- This is the file where you will write the app's main logic
Form1inherits from System.Windows.Forms.Form, a class that represents a window or dialog boxForm1ispartialbecause part ofForm1is defined in another file (Form1.Designer.cs)Form1's constructor callsInitializeComponent()which is defined in Form1.Designer.cs
- Form1.Designer.cs
namespace HelloWindows { partial class Form1 { ////// Required designer variable. /// private System.ComponentModel.IContainer components = null; ////// Clean up any resources being used. /// /// true if managed resources should be disposed; otherwise, false. protected override void Dispose(bool disposing) { if (disposing && (components != null)) { components.Dispose(); } base.Dispose(disposing); } #region Windows Form Designer generated code ////// Required method for Designer support - do not modify /// the contents of this method with the code editor. /// private void InitializeComponent() { this.label1 = new System.Windows.Forms.Label(); this.SuspendLayout(); // // label1 // this.label1.AutoSize = true; this.label1.Location = new System.Drawing.Point(84, 42); this.label1.Name = "label1"; this.label1.Size = new System.Drawing.Size(84, 13); this.label1.TabIndex = 0; this.label1.Text = "Hello, Windows!"; // // Form1 // this.AutoScaleDimensions = new System.Drawing.SizeF(6F, 13F); this.AutoScaleMode = System.Windows.Forms.AutoScaleMode.Font; this.ClientSize = new System.Drawing.Size(284, 262); this.Controls.Add(this.label1); this.Name = "Form1"; this.Text = "Form1"; this.ResumeLayout(false); this.PerformLayout(); } #endregion private System.Windows.Forms.Label label1; } }- This is an auto-generated file that you should not need to modify (only modify if you really know what you're doing)
Form1is markedpartialbecause theForm1class is partially defined here and partially in Form1.cs- All components added the form (e.g., labels, buttons,
text boxes, etc.) will be declared in this file (see the declaration
of
label1at the end of the file) InitializeComponent()sets all the components' properties (see the settings forlabel1and theform)#regionis a preprocessor directive and with#endregioncan be used to create collapsible code///used to provide XML comments which VS uses to produce documentation
- Program.cs
-
Event handling
- Drop a Button onto the form from the Toolbox
- Double-click on the button to setup a callback or event handler, a function which is called when the user clicks on the button
- Add code to change
label1to say "You clicked the button!":private void button1_Click(object sender, EventArgs e) { label1.Text = "You clicked the button!"; } - Ctrl-F5 to run; click the button and observe the label's text change
Form1.Designer.csdefines a System.Windows.Forms.Button object that has aClickevent. The += operator register's theClickevent's callbackbutton1_Click():this.button1.Click += new System.EventHandler(this.button1_Click);
- Multiple controls can share the same event handler
- Add another button to the form
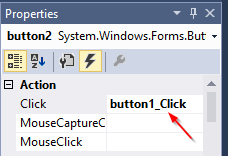
- Make the second button's Click handler be
button1_Click

- All event handlers have a sender parameter, which is the object that
triggered the event
private void button1_Click(object sender, EventArgs e)
{
	// sender is either button1 or button2
	if (btn == button1)
		label1.Text = "You pressed the first button!";
	else
		label1.Text = "You pressed the second button!";
}
- Use F5, F10, F11 with breakpoints to examine variables, etc.
- Use
System.Diagnostics.Debug.WriteLine("debug message")to display debug information in Visual Studio's Output pane