- Taz is a departmental computer running CentOS, a Linux-based operating system
- Taz is running an Apache web server
- Apache is the most popular web server, and it is often used on a Linux box
- Moving your web pages to Taz allows any web browser to view your pages
- Taz's home page: http://taz.harding.edu/
- Taz's web server is only accessible inside Harding's firewall
- Keeping Taz inaccessible from the outside world reduces Harding's liability if you were to create web pages with copyrighted material or with information that led to someone getting hurt
- When logged into the Harding domain, you are inside the firewall
- When connected to Harding's secure wifi, you are inside the firewall (How to connect to Harding's secured network)
- Harding's Guest network is outside the firewall
- You can access Taz's web server from outside the firewall by creating an ssh tunnel
- Everyone in this class has a Taz account
- Your username is the same as your Harding username
- Your initial password is your H number (including the H) but I recommend you change it
- Using the command-line interface (SSH with Putty)
- Gives you the most power and flexibility but requires you to memorize and type commands
- Windows users:
- Use the free Putty SSH client to securely login to your account from Windows
- After running Putty, enter taz.harding.edu in the Host Name field and click Open
- A console window appears where you enter your Taz username and password
- Mac users can use the ssh command at the command line:
$ ssh username@taz.harding.edu
- When you first login, you will be sitting in your home directory:
/home/username - Use the
cdcommand to move to your public_html directory$ cd public_html
- List your files using the
lscommand$ ls -l
- Use Nano to edit your index.html file
$ nano index.html
- Ctrl-O saves your file
- Ctrl-X exits
- Use your mouse to highlight text you want to copy, and right-click to paste. Otherwise your mouse doesn't do anything
- Your index.html web page is available at this URL: http://taz.harding.edu/~username/ where "username" is your username. My web page is at http://taz.harding.edu/~fmccown/
- Recommended to change your password using
passwdcommand$ passwd
- Summary of useful commands:
cd dirnameChange to a different directory cd ..Go back one directory level ls -lLong listing of current directory rm filenameDelete a file cp filename newfilenameCopy a file to a new file cd dirnameChange to a different directory mv oldfilename newfilenameRename a file mkdir dirnameCreate a new directory nano filenameEdit a file pwdShow the name of the current directory
- Using an SCP or SFTP client (WinSCP)
- Use the free WinSCP client to manipulate your files using a GUI
- Run WinSCP, click New, enter
taz.harding.eduin the Host name field, enter your Taz username and password in the appropriate fields, and press Login
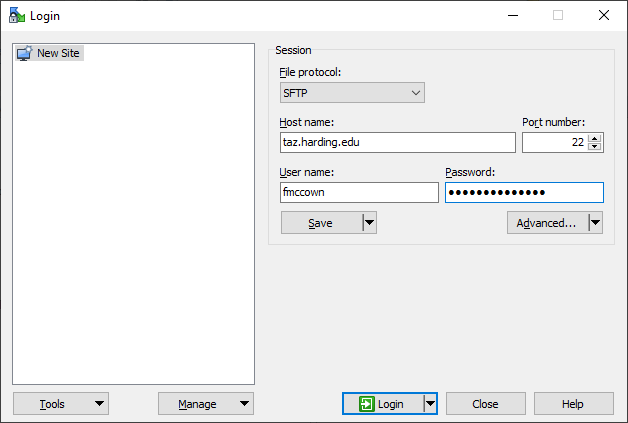
- The first time you login to Taz, you will see a warning about the server's host key not being found. Press Yes to continue
- You will now see your computer's files on the left side of the window
and the file system on Taz on the right
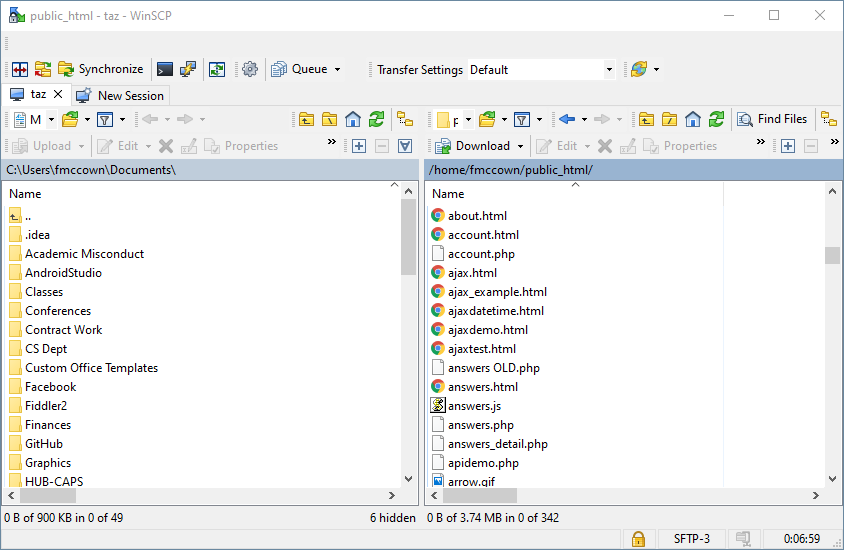
- To edit an existing file, right-click on the file and select Edit. Any changes you make will be saved back onto Taz
- To create a new file or directory, select from the menu Files → New → File... or Directory...
- Drag-and-drop files between sides to copy files back and forth from your computer to Taz
- WinSCP: Make Notepad++ your default text editor
- Menu: Options → Preferences...
- Click Editors on left side
- Click Add... button on right side
- Click External editor radio button, then Browse button
- Navigate to C:\Program Files\Notepad++
- Double-click notepad++.exe
- Click OK
- Select Notepad++ from editor list, and press Up button multiple times until Notepad++ is at the top
- Click OK
- Linux is case-sensitive, so the files
Apple.htmlandapple.htmlare distinctly different - Windows is case-insensitive, so you may not have two different files in the same directory named
Apple.htmlandapple.html - When transferring your files to Taz from your Windows computer, it's not unusual
for images or style sheets to suddenly "break"
-
This happens many times because the HTML is using a lowercase version of
the filename (e.g.,
happy.png) but the file is actually stored with some uppercase letters (e.g.,happy.PNG) - It's best to always use lowercase letters in your filenames to prevent this from happening
- If you notice that an image that was visible on your computer is not visible when transfering your files to Taz, first make sure the file is actually on Taz, then check to see if your HTML and the filename are exactly the same and fix accordingly
-
This happens many times because the HTML is using a lowercase version of
the filename (e.g.,
- Each file in Linux has three types of access:
- read
- write
- execute
- Every file belongs to a specific user and group
- All students are in the
studentgroup - All faculty are in the
facultygroup - Any type of group could be created by the sysadmin
- All students are in the
- When you view a long listing at the command-line or look at the Right column in
WinSCP, you see each file's permissions as a string of 10 characters:
- Example:
-rw-r--r-- - Character 1 is the type of file:
-is regular,dis directory,lis link - Chars 2-4 are the owner's permissions (read, write, execute)
- Chars 5-7 are the group's permissions (read, write, execute)
- Chars 8-10 are other's permissions (read, write, execute)
- Example:
-
For security purposes, it's best to use the minimum level of permissions to
get the job the done
- Usually only user needs write permissions to files and directories
- To make a file accessible to Apache, the file needs the "other" permissions set to read; directories need execute for others
- If you don't want the file to be displayed on the web, just remove the read permission from others (gives 403)
-
How to change file permissions
- If using Putty, use the chmod command
- If using WinSCP, right-click the file and choose Properties, then check whatever permissions you want the file to have